Scrap Factory Expanaion Packs

Friday, October 31, 2008

OH DEER plus scal pattern

When cutting this card out
with the left overs i ended up with
three cards that i am very happy with
I used the new alota stamps
and added cuttlebug die/emboss tress

I masked the front dear to add a second one
behind

Masked the front deers again to add extra ones behind
the front ones

Oh and this pattern did not need Tweaking
so it is ready to share
if you have Sure Cuts a Lot HERE IS THE PATTERN

I designed using inkscape and cut via SCAL

Thursday, October 30, 2008

CUT work

I really get inspired when my new design team
stamps arrive to make more and more cards
which also means make more base cards as well
So when the stamps arrived this week I played around with inkscape
and cut some out
stamp used is alota rubber stamp
I added hand drawing to faux the stitching


Merry Christmas (left over parts again )

When i made the
MERRY Christmas donkey
this is what what left on the mat of the green
so once again i made it into an extra card.

And used one of the new
alota stamps

Wednesday, October 29, 2008

MERRY Christmas ( using left overs)

When cutting out the
MERRY CHRISTMAS Santa

I was left with the black negative on the
mat after making the card
so here is the card i made using the negative
and added one of the new alota rubber stamps , then
added gold stickers to the card

TWO years have gone by

MY BLOG IS TWO years old
I have had a web site before my blog
and shortly after the web site had closed i sat
here looking at peoples blogs thinking
"i want one of them" so i started up one (TWO years ago today)
though I did not do much for the first couple of months.
I really enjoy posting, helping people and getting to know
lots of people through the blog .
I am soo happy that you all choose to visit my blog
and hope you will all continue to visit for many years to come


FALL Gallery card

This is another one of my "takes " on the
gallery card like i have made last week
I used some of the new alota rubber stamps
designed the card in inkscape and cut using scal


Tuesday, October 28, 2008

HELP INKSCAPE basic converting logo (NOT 003) but 004

Here is another basic lesson on converting a logo
in inkscape ready to cut in scal
LETS BEGIN
Open inkscape and File, Import and pick the image you want

this one was a bmp file (which i was helping someone with)

No go View, Display Mode and Outline

Then your picture will turn into a cross
now that is fine that is what you want

Now Path, Trace Bitmap
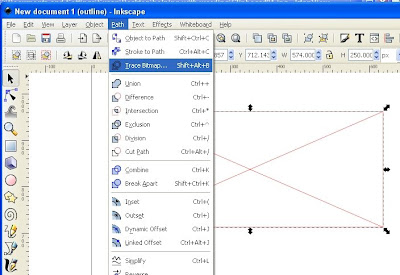
a dialog box with pop up
now you can adjust the brightness cut off
i normally for this sort of thing put in about 0.65
then push OK
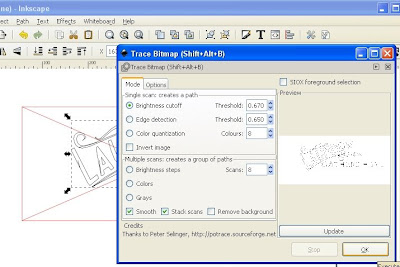
You can close that dialog box and you will
see you have a tracing of the logo on top of the x
High light and delete the x box

and now you are left with you logo

now all you do is save as .svg
open sure cuts a lot and IMPORT .svg on and cut
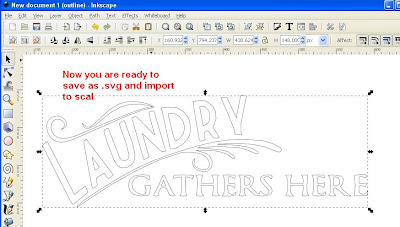
Monday, October 27, 2008

Sunday, October 26, 2008

Cuttlebug Farm kids (gallery card )

Here is another take on the Gallery card that i bloged yesterday
I designed this on in inkscape and cut it using sure cuts a lot
Used the cuttlebug embossing folder to emboss .
then highlighted the embossed part with chalk ink pad
and stamped alota images on the card

Saturday, October 25, 2008

Cuttlebug LITTLE lady (gallery card)

I used the cuttlebug embossing folder for the
trims of this card which i think made it great
the embossed part is metallic card stock
and the photos just doesn't do it justice
stamps used are Alota rubber stamps


This card is also a lesson on the
alota rubber stamps lesson cd number 6

Friday, October 24, 2008

TEABAG folded

This is a card i made a few years back with a revolving
stencil (i have missed placed the stencil but when i
find it i will tell you the brand name)
I printed the teabag papers and folded them then
i wrote a program to print the frame in the same pattern of
the teabag papers


Thursday, October 23, 2008

FROG frog (sars)

I am still working on things i can not show you
all right now , But i can promis that when November and
December come you will have all these things to look at.
So in the mean time i will continue to show you things
that i have made in the past and have not got on
my blog yet (well i don't think i have them on here)
these two are done with the same set of globe dies
that i showed the snow globe yesterday from
Some assembly required die snowglobe set
and i just added the parts on to make a frog


Hopefully today i will put the things i cant show
right now aside and design something new to show
tomorrow

Wednesday, October 22, 2008

Kookaburra SNOWGLOBE

While i spent yesterday back working on things that
i can not show you till december
I thought that i would

find other things that i have made in the past to show you
this is a Some assembly required die snowglobe set
After cutting all the pieces out i used a white paint pen
and added dots all over the clear parts before assembling
the globe added a Kookaburra as i was making it


I have had many requests of how to make these
and if I was going to make a lesson.
Sorry i can not as the dies comes
how to put them together and as you need the
dies or stamps to make this then you will have the
instructions SARS

Tuesday, October 21, 2008

Who is sitting on the WALL?

This is done with the snowglobe base dies from
some assembly required
and then I used the lard egg set of rubberstamps from
some assembly required
Hand cut the arms and legs
Also collapses flat to put in envelope


I have done another humpty dumpty in the past post in a card

Sitting Around


Monday, October 20, 2008

SWAN 3D origami

20 years ago when l worked in the city l used to love looking
at the origami in one of the shop windows that l used
to pass on the way to work, never thinking that
many years later l will know how to make them.
Yesterday i got side tracked from the project that l was
working on (well need that by december so that gives me time LOL)
when i found this wonderful Youtube of this swan
I have done origami and teabag folding in the past
but never made anything like this.
I cut the 480 pieces of paper and set to work folding
at first the pile of paper never seemed to get smaller but suddenly l
was ready to re-look at the youtube and put it together.
I am soooo happy with the result


Question HOW long did it take ? TOOK me nine hours to make
OK I am crazy that is a lot of work but now i can say
yes I have done that before

Sunday, October 19, 2008

Printable PAPERS set 02 PURPLE (last in this set)

Wish i could show you what i am working on
at the moment but you will have to wait till
December to see them all .


But in the mean time more in our week of
printable papers
You can down load this HERE

There are 6 colours in this set of printable papers
Blue, brown, green, lilacblue, pink and purple
AND if you are visiting my blog for the first time you will
find quiet a few printable papers that i have shared this week .
enjoy would love to see your creations that
you make with these patterns


Printable PAPERS set 02 PINK

And other in this set you can download HERE

Printable PAPERS set 02 Lilac blue

You can get this set HERE

Printable PAPERS set 02 GREEN

this set can be downloaded HERE

Printable PAPERS set 02 BROWN

You can down load this set HERE

Printable PAPERS set 02 BLUE

Years ago when i used to design
printable backgrounds i used to do just
on pattern , Now i like to design a set
of three that way i know that they all are the same
tones and they will match
You can download this set HERE

Saturday, October 18, 2008

Seaside NOTICE board

Here is our home notice board
I brought a photo frame/cork board
removed the glass away
and then
stamped lots of seaside images and 3Ded them