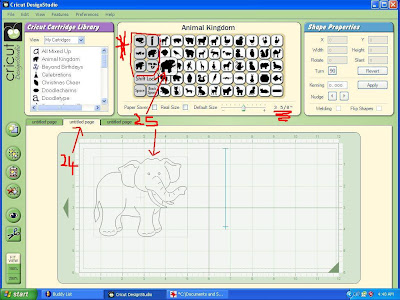
1. Open and Select the cartridge you want to us (in this lesson i am using Animal kingdom)
2. on key pad you have to mark for shadow (will be in different spots depending on cartridge used)
3. Set default to the size you want it to be (leave it there throughout the lesson)
4. Select the thing you want to use (elephant for this card)
5. place on , I like to work as the fold line of my card is going to be the 6" on the mat, just makes it easier
 6. now copy
7. and paste
8. Use THIS arrow to move pasted image left
 9. With that still highlighted click flip
10. with this arrow move so it is in place the left hand side of the 6" mark
11. Now most images you will now see that there is only one piece of the images that will be touching for folding and that is not reall enough UNLESS it is more than about 1 1/2 inches......
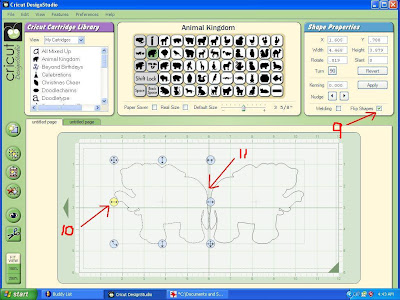 12. so start with one highlighted go to rotate and
 13. type in a number that you think will rotate it enough so two piece touch (this may take some time to work out and is the easiest way to make sure that they will both line up when they are cut DO NOT USE THE ARROW to rotate) So in this case 7 was enough to rotate for it to work .
14. So now you have one that is able to touch the center 6 mark............
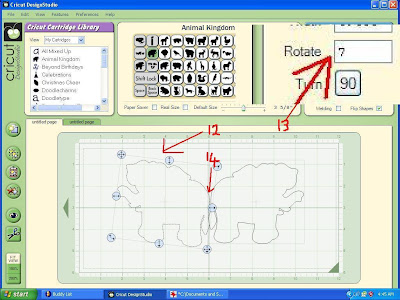 15. now highlight the other image
16. Now up to rotate and type in - (and the number that you typed in the other one) in this case it is -7
17. They are both now rotated and over lapping the 6mark on the mat (if not just use the straight arrows to move them in place)
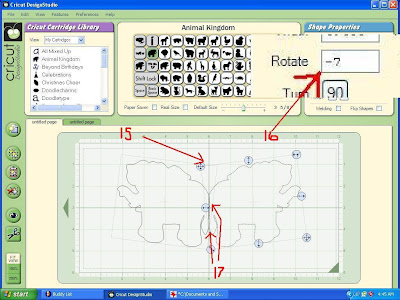 18. highlight each one, one at a time
19. and click weld for each one
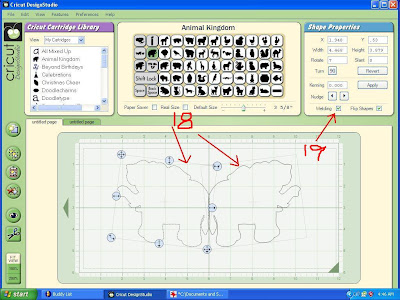 20. get a new mat for viewing
21. click preview eye button
22. then you will see what the cutting is going to look like
23. You can check that least two places is going to be connected
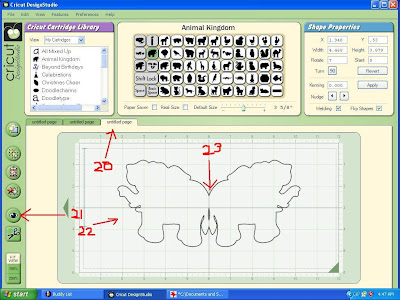 24. now for new mat for pieces to go on card
* Things vary from cart to cart
25. select the top main picture for your card (*in this cart nothing is highlighted) Making sure that you don't change the default size
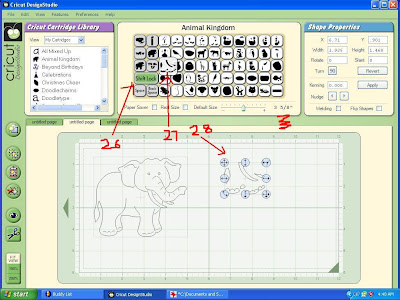
 26. Now to look for all the parts you need (varies for each cart and design)
27. And select the pieces you need
28. placing them all on the mat (*being sure to place the card on mat at the same point as these )
 Then you cut the base out
 score line down the center and fold it making sure it lines up well
 I set my mats up on the screen to have several colours cut at the same time it is just a matter of putting the card stock in the right place on the mat to match your screen
 and here are the pieces both colours cut on the one mat
 add the main piece on to the folded base card
 now because all my pieces were cut out of the white and i want some gray i now colour pieces i want
 Then add the pieces on the card
 Using a marker i now highlight the lines that were cut
 and now you can make any shape stand up card you want from any cartridge you have
 enjoy yourself
 Make HEAPS

9 comments:
Susan,
I LOVE all of your designs! Thank you so much for sharing all your ideas and especially for teaching us how to use the CDS. I am just beginning to experiment and your directions are so easy to follow.
Thanks again!
LRJ
Thank you, Thank you, Thank you
I have printed out your instructions and am looking forward to making many cute stand-up cards.
You are very creative and a GREAT teacher.
Thank you
Marjorie
Ok, I am putting you into my favs. your lessons rock and are so helpful! THANK YOU!
I am new to "blogging" but love your site you are so very creative and your make it seem so easy....you have me believing I can make anything.... Thank so very much for sharing.....
rose
I am brand spanking new to the cricut, and your blog has given me so many hints and tips ! Thank you xx
Thank you! Thank you! thank you! I have been wanting to make birthday cards this way for a while but couldn't get it figured out in DS. I really enjoy all of your posts and appreciate you sharing your wisdom and creative efforts. Hopefully one day I will have more time to devote to card making. :-)
Mags from South Africa
These cards are great am also new to the whole cricut thing and am also experimenting.
Thanks alot
tfs your talent and technical knowledge. today i created a shaped card and have pposted to my blog http://longlivescissorsandpaper.blogspot.com/2010/08/i-was-sly-like-fox.html
Wow. I was searching for something totally different and stumbled upon an image you had for a stand up card. SO CUTE! I'm so glad I read this post! I don't have the design studio software but I am about to get it and am going to try this idea. Thanks!
Post a Comment