Scrap Factory Expanaion Packs

Showing posts with label instructions. Show all posts

Wednesday, November 27, 2013

"IN POP" Card As I demo'ed on Make the cut webinar 26/27 Nov 2013

In the Make The Cut Webinar today 
I demoed how to make this 
"INPOP Card"
if you have Make the cut and would like the basic MTC file 
it is HERE
Designed and cut with MAKE the CUT
The card folds flat for putting in envelope
 But when the card is open on display it  becomes 
a 3D pop card (in pop  )
 When you open the make the cut file you will find 
the bottom 6 layers   are  the main base of the card 
one score and one cut  for each three layers 
(NOTE I have solid likes  for the score lines that is 
because i use a scoring tool in my Zing you will have 
to change the lines if you want dashes)
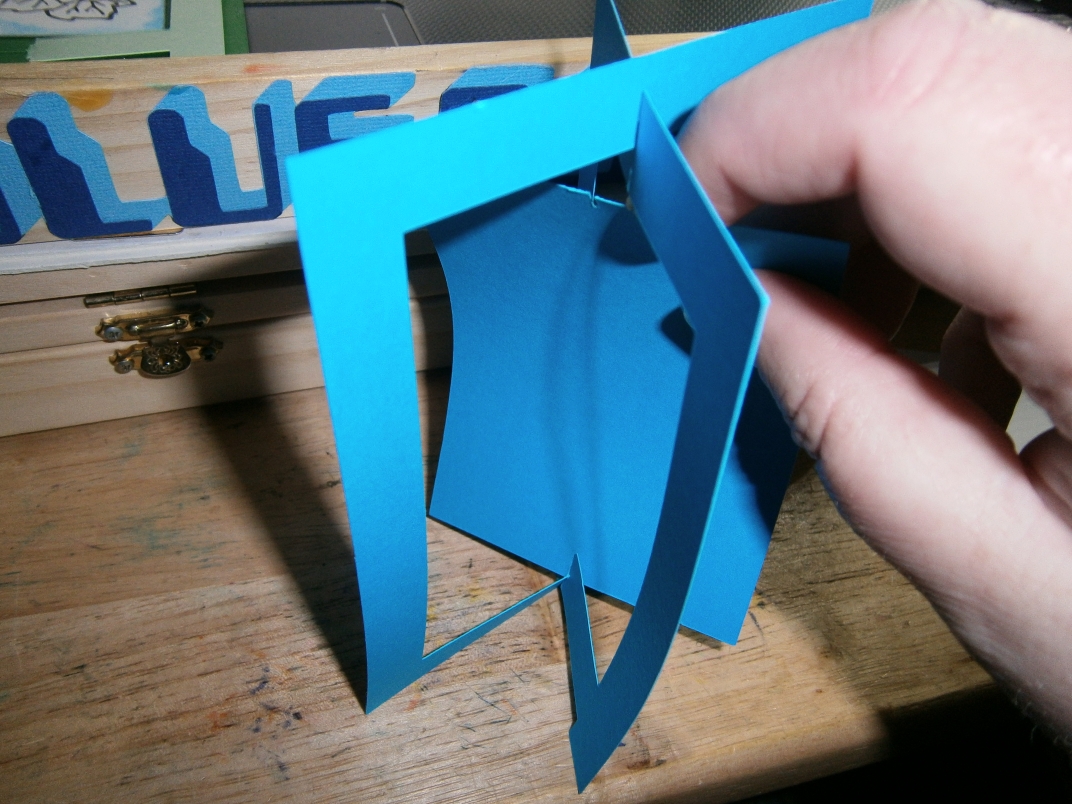
 With these three pieces you fold as shown
 Then you put it on the table like this
 Add glue on all three 1/2" tabs as shown
You then glue  to the tabs as shown 


 one then the next
 And lastly fold the last one in so it glues to the insde 
of the back of the card
Here is what you have now  (wait till glue is dry)
 When you close your card here is what you see so far
 Now yo have the two tabs showing on the in pop
This is how it looks  from the top of the card


 Put glue on the last square
 And put it in the in pop to cover the tabs
 Now your card is ready for decorating
 how ever you like  ( I have added two frames and 
a in pop background)
 here is what they are
 Glue the frames together
 Then glue for front of the card
 Frames it well and add the background in the
center
Now if you want to  add another demention
you can make a tab to fit on half way 
(see webinar for instructions for this 
as it is not my picture so I could not include 
in the MTC file)


 So this now sits half way from back and front
 like this
 Top view
 front view
 And still folds flat
 I then while it was flat added the words so as it 
looks good while it is being taken out of envelope 
and when open the top word (merry will be off center 
but still looks good )
 If I had of put the MERRY in the center while it was opened
when it was closed the Y would be not in show.
(but you can put the wording where you feel is better )
 Enjoy will love to see what you make  from this idea
 Don't forget to watch the WEBINAR 
to see how  to make patterns like this 

HAVE FUN
be sure to let me know what you think


 If you live in Australia and New Zealand 

and wondering where you can get a
Zing then SKAT KATZ is the place to find them


Thursday, December 20, 2012

M-Bossabilities Embossing folder in EBosser tip

When I got the E Bosser I was hoping that I would never
have to get out the other embossing machines again .
But there was No sandwich for the 
M-Bossabilities embossing folder from spellbinders.
SO I was not going to let that hold me back I measured
a normal sandwich that goes through the ebosser and 
worked out that with an extra C PLATE (sold seperately ) 
 I could  do it and I was right it works soo nice a nice 
crisp emboss 
 Here is the plate order (sandwich)
 For those of you that have not seen the M-Bossablities 
they are two sided embossing folders and wonderful too 


If you live in Australia and New Zealand 
and wondering where you can get an

Ebosser then SKAT KATZ  is the place to find them

Monday, December 03, 2012

Clear ornament

Yesterday I showed an ornament that I 
made for the alota challenge . Today I am here
to show how i got it made.
A while back I showed a fantastic extension that i found
for inkscape to make tabbed boxes HERE.
Well it started me thinking maybe i can make 
the boxes the same way but with card stock (but 
I would have to do some tweaking )
then I made this white boxes 

All put together with NO GLUE 
hmm got me thinking  NO GLUING  that is 
perfect for clear acetate as  that is not an easy 
thing to glue
So with that same pattern that I had tweaked 
(adding the extra little part on each tab so that they 
lock together and not pull apart easily)
I cut it out of clear over heat projector plastic 
and then put it together  (little testing being clear but 
I did it  ) designed in inkscape and Designed in MAKE THE CUT to tweak
and cut on the ZING. Added white paint pent for the snow.
 If you live in Australia and New Zealand 
and wondering where you can get an

Zing then SKAT KATZ is the place to find them

Tuesday, November 27, 2012

Repeat pattern Sizzix embossing folders

I have lots and lots of embossing folders , all brands 
and I am here today to show  how to put the sizzix brands 
side  by side to get them to look soo neat after going 
through the Ebosser.
In this picture I show the sizzix and a darice 
folder .
The Sizzix one has  a cut out on one of the sides 
where the embossing ends . The other does not .
You can see it bettter in this one
We will put the darice one aside and use that
in another demo (when a package arrives)
With the sizzix one you can get a continuous embossing
just cut card to size and first run through the ebosser
as normal
Then you move it along till it lines up with the last
emboss you did the good thing is that cut out  
allows you to get close to repeat the pattern without 
a flat line appearing after embossed
Put through you ebosser as normal with normal 
sandwich. and the result will be you do not know  
where you joined them
(NOTE the real early sizzix ones do not have this cut out)
 If you live in Australia and New Zealand 
and wondering where you can get an
Ebosser then SKAT KATZ  is the place to find them

Sunday, November 11, 2012

Little One Stamped edge lattice card ( I demo'ed on the webinar on 30/31 october 2012 )

Stamped edge lattice card
I demo'ed on Make the cut webinar 
 on 30/31 october 2012 
You can DOWNLOAD here to watch and learn
 Designed in MAKE THE CUT

Let me know what you think.
(I have taken of word thing too make this 
easier now)
I am off to  explore some more.
 If you live in Australia and New Zealand 
and wondering where you can get a KNK Zing 
SKAT KAT  is the place to find them

Thursday, October 18, 2012

SliceForm Floating card (as seen on 16/17 October 2012)

I have been demoing on the Make the Cut Webinar again
on the 16th/17th October 2012  HERE.
This time I demoed the Sliceform floating card 
and I am here today to share the MTC pattern for the 
basic 4" x 5" one .
LET's Begin
The pattern is HERE
Designed in MAKE THE CUT 


Be sure to check out the recording of the webinar 
HERE
to see how to make your own.
In the mean time I would love to see your creations 
that you make  be sure to let me know 

Let me know what you think.
(I have taken of word thing too make this 
easier now)
I am off to  explore some more.
 If you live in Australia and New Zealand 
and wondering where you can get a KNK Zing 
SKAT KAT  is the place to find them