
First of a set of Basic drawing for cutting in inkscape lessons
LETS BEGIN
in this one we are going to make a
simple snow flake sort of
(i was completely happy with this flake so after the lesson
was complete i went back and remade it putting the
rectangle box so it was not in the middle of the circle)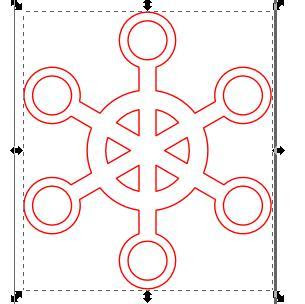
in this one we are going to make a
simple snow flake sort of
(i was completely happy with this flake so after the lesson
was complete i went back and remade it putting the
rectangle box so it was not in the middle of the circle)

 But you will get to see how things are done Start by making a circle on your page
Then go up to PATH and OBJECT TO PATH

Now highlight that circle

and Do a "control D" (on your keyboard)
which will give you a duplicate on top of that one

You now hold the control and shift key down and move the arrows
on the image inwards (or outwards ) ****then miss green lot of lessons
other shapes follow green writing
NOTE this also shows if you were using shapes like letters or uneven shapes instead of holding down the shift and control you do a PATH and DYNAMIC OFFSET

then holding the little square move that in or out

And go object to path

Ok now you go and get a rectangle
and add to the bottom of the circle
(i redid this and did not have it in circle but it is up to you what look you want)

Then PATH and OBJECT TO PART

Highlight all these and go to align
(which is the button two to the right of the T)

And click on the button of that "centre on vertical"
(the third button on top line )

select the two circles and then PATH and COMBINE

Now select all and PATH and UNION

It will now look like this

Double clicking on the image you will see the arrow around the
edge change and also a + in the center of the image

select the + with your mouse and move the + to the bottom of
your rectangle

With that still highlighted
you go EDIT , CLONE and CREATE CLONE TILE

A box will pop up you select the
ROTATION folder
And the where the ANGLE is change the
first one to 60.0 and the second to 60
the down the bottom where it says collums and rows
the first one is 1 and second is 6
then push on create and you will see
that your image is now snowflaked

Delete the first picture as that is not needed
(little pair of scissors on top line or control x on keyboard)

then highlight all the flake pieces
and
EDIT UNION

And your image will look like this
I have a tiny dot in the center that is not needed
so i go EDIT BREAK APART

Then highlight that dot and delete that dot

Select everything and EDIT and COMBINE

Now to add to that i make a circle

dulpicate and make the second smaller by holding
down the control and shift key and moving
inwards

Select both of them circles and PATH and COMBINE

Highlight both objects and get the align again
and do align vertical and horizontal
(3rd one in on each row)

they will all be centered now

With them both highlighted still do
PATH and UNION

Finished or you can keep adding to it if you wish
this was just a quick idea to get to know the clone tile function

Try starting with rectangle and have other rectangles coming off that
or anything really
(let you imagination take you )

2 comments:
Susan....you're just great for us Inkscape (and Scal-) users.
Thank you very much.
Allet
The Netherlands
Wow that is amazing!!! I really need to get into using Inkscape - thank you for this lesson!
Leanne
x
Post a Comment