Follow on from yesterdays lesson "how to clean up the fonts for cutting on sure cuts a lot
as really some of the things can be insane to cut .
They cut all these lines that no way can you glue in place
LETS BEGIN
You have broken your design apart and in outline mode (other lesson)
HELP using dingbats with scal via inkscape".
I thought i would show you
how to clean up the fonts for cutting on sure cuts a lot
as really some of the things can be insane to cut .They cut all these lines that no way can you glue in place
LETS BEGIN
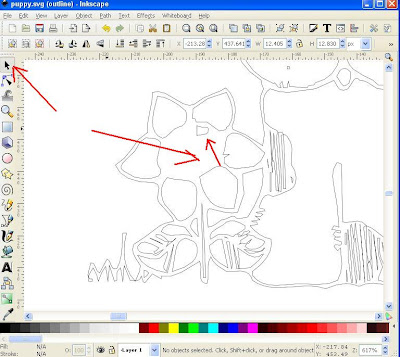
You have broken your design apart and in outline mode (other lesson)

Looking at this font that the black spots are a mess for cutting and
not needed as well as in side the flower so here goes

Center of the flower, all these pieces are just little slits when cut and no way
you can paste on the cut piece so we remove and clean up a center for this,
at the same time i will remove the grass it will look silly as black background squiggle

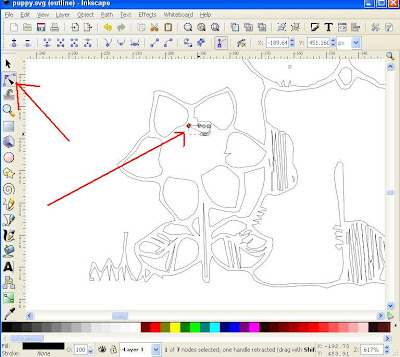
With the node tool you highlight the nodes (squares ) one at a
time and stretch them in to place (sometimes you might need to move around
the little circles either side of the squares to get the shaping right
NOT AS SCARY AS IT SOUNDS GIVE IT A TRY)

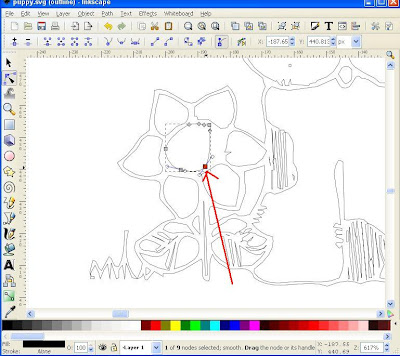
Keep stretching out the nodes (if you need to add another node you
just double click on the line and it will add one so you can shape it easier)

Now the center of the flower will look like something that can be put together much easier after cutting

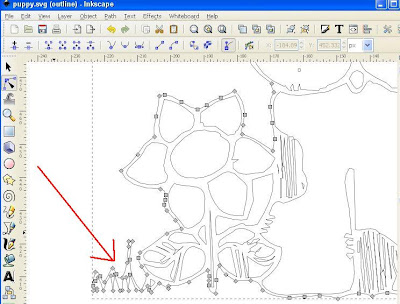
With the node tool on you can highlight a heap of nodes
all at one by selecting them all (holding the mouse key down and
selecting them by moving the mouse over them )


12 comments:
Thanks Susan so much for these valuable lessons. I was so disheartened when I first got SCAL to see how it makes a lot of lines into 'double cuts'. You have made SCAL wonderfully usable for me and learning to use Inkscape a LOT easier. Now I love it! Please keep the lessons coming- they're great!
I woke this morning thinking i was wasting my time making lessons and then to get get comment left like this makes it all worth while thank you soo much for leaving this comment. I will keep them coming
Your lessons are incredibly helpful. I hope to get a chance to try them soon. I had kind of given up on inkscape because when I first tried it I didn't have a clue how to clean up items I wanted to cut and they were cutting out a mess. Your instructions are so clear that I just need to get in there and try it! Thanks so much for sharing your knowledge!!
Joan in AZ
Hi Susan,
I love seeing your lessons and learning about SCAL.
And when you make furbaby lessons I am in heaven!
Thank you for your lessons, not many people would do what you are doing for strangers!
Marda
I don't know if the first one went through or not.
But I think your lessons are fantastic and to help people that you have never met, what can I?
It is wonderful!
Thank you so much for all these lessons. You make it so very clear and user friendly. I do appreciate all of your time and effort!!
Thanks again
Love this lesson! I have found so many cute dingbats but they have such little details that I thought I would never be able to use SCAL to cut them. Now I'll be able to! Thank you so much!
Thank you this one wil be especially helpful for me.
Thank you again for another lesson, I honestly didn't think that I would be able to use inkscape...I followed your first set of instructions and was able to do it...except for the unconnected lines...you are a lifesaver!! Thank you, thank you for taking your valuable time to do this for the rest of us!!
Hi Susan :
First of all thanks so much for share your knowledge about everything you know , you are very talented, this lessons about working with SCAL very helpful like many others my dingbats was cut into a tiny pieces,thanks to you things got clearer , I have a question how can Inkscape open a .TTF ?how convert to a Inkscape format?.. Sorry if I missed that.Have a Great Day.
Erika in Mass
every group I am in every blog I read seems to direct me back to you...Susen I think cricut, sure cuts alot& inkscape should be putting out some cash for you!!!!I WOULD OF NEVER THOUGHT ABOUT BUYING DS OR SCAL IF YOU DIDNT DO THESE LESSONS...Thank You so much.
Susan, I have been back to your blog a number of times. Each time I am here, I learn something new. You are a tremendous asset to the Cricut community with your knowledge and willingness to teach through your tutorials. Kudos to you and thanks for a job well done!
CindyS. from PA
Post a Comment