I have had many requests for a FULL Instructions
from START to FINISH
(from dingbat-inkscape-sure cuts a lot and then made)
SO here it is There are heaps and heaps of photos all 154 of them.
But you all asked for it .
(from dingbat-inkscape-sure cuts a lot and then made)
SO here it is There are heaps and heaps of photos all 154 of them.
But you all asked for it .
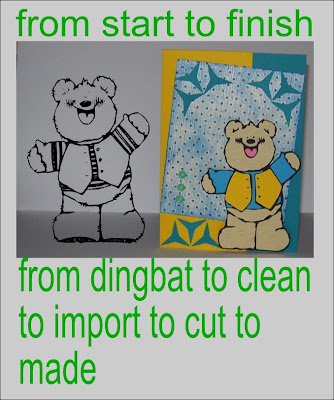
First why i do it well one below on left is dingbat un-touched and besides me
putting his head on a little crooked most pieces it cut i could not put on as they were slits
even things like the ear tail and cake were too small to handle that i had to put glue and
drop into place.
The one on right i spent 3/4 hour on and it looks more like what i wanted.
(note it took a while to find a ding that i could even cut the un-touched way that
i could even put something that looks a little like it is supposed too)
START
From DINGBAT to CLEAN
LETS BEGIN
Firstly let me say SAVE SAVE SAVE all programs have there
faults and not much fun getting so far into you creation just to find that
the program has crashed (BEEN THERE DONE THAT )
OK
Open inkscape, select the A on left had side forth up from bottom.
Type a letter I am using "f" (ok it is not in the font you want to use )
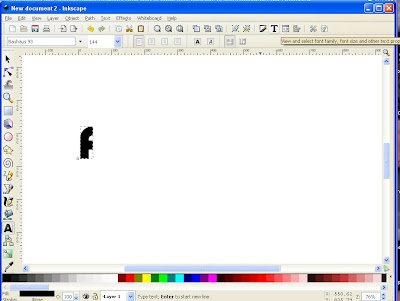
A dialog box will pop up select the font you want on the left had
column (Laurie'sCountry is the one I am using in this lesson )
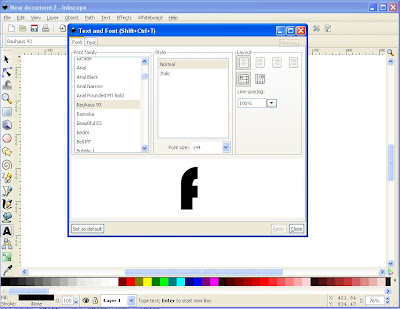
Click on the one you want and the f down the bottom will now
change to the font. Click apply and then close (both down bottom right hand corner)
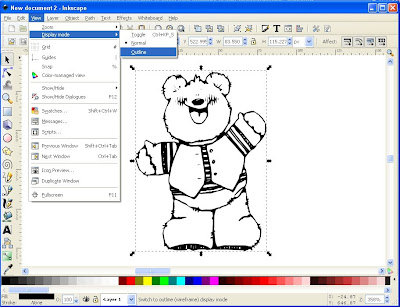
You will see the outline with all those double lines
(note if you leave this and come back to work on another time you
will have to go outline again as it will look like a horrible mess and
don't panic just change to outline)
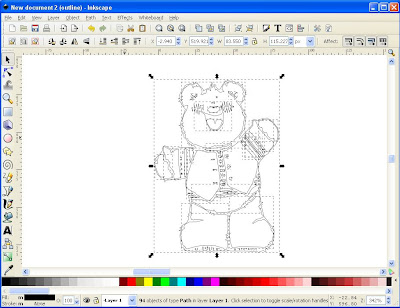
OK to start with the shirt and vest there is no way that cutting this as it
is with the stripes like it is will cut like any thing that you can even put
together after cutting .
so i select this section
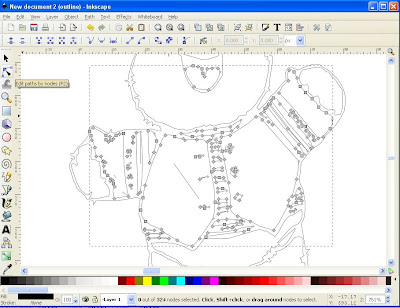
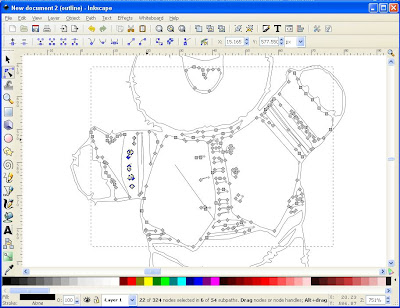
Start on the one side of the arm select a heap of the nodes from the stripes
by holding down the mouse draging and it will draw a box around them and they
will turn blue
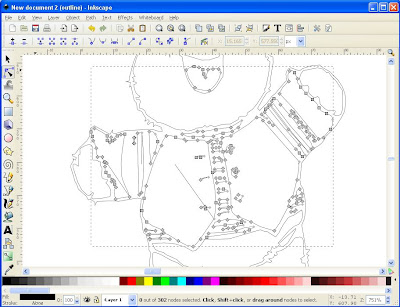
Select some more either by putting the box around them
of clicking on them one at a time HOLDING down the shift key on your keyboard
Push on the "-" button second in top line
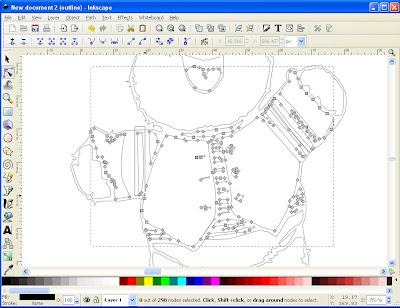
I still had a few left so l selected them by holding down shift key
Push on the "-" button second in top line
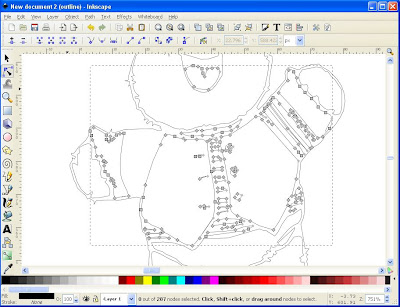
grab the last node on the sleeve hold the mouse button down and drag out to
where the sleeve should now be
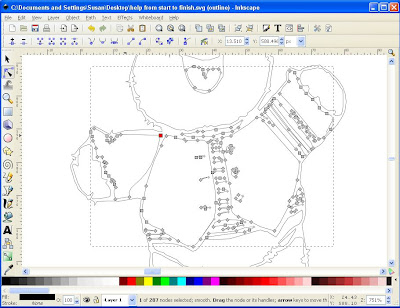
To add shape into that line you have just made you select
both nodes on each side (hold down shift)
they will both be blue
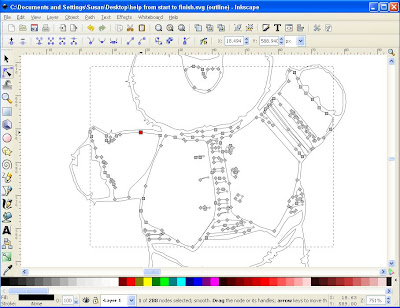
And the bottom node draging it to where you want the sleeve to be
YOu will notice that the line might have wave in it like mine at times

One sleeve is now completed
(Note sometimes some extra lines apear in your work that is not really
there (see sleeve and right hand vest) they will go away when you do something )
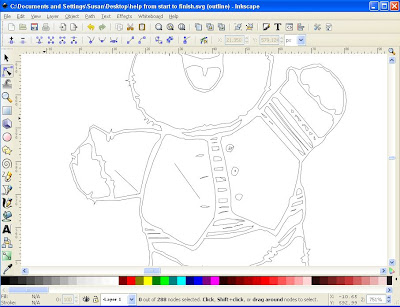
While on this arm i noticed that the border was too close (red node)
so i just selected it and draged it down a little
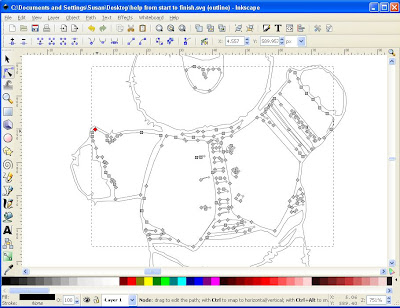
Now i think i am happy with all that arm
(this is where only you can decide if it will look ok or not )
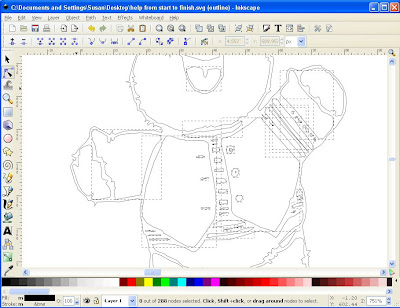
Now the strips down the front of his shirt are needed to be cleaned up
with arrow button top left hand column
select them
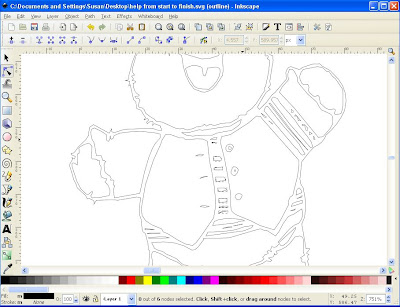
then control x on you keyboard
(notice i left one up top and bottom so i knew later where to take things)
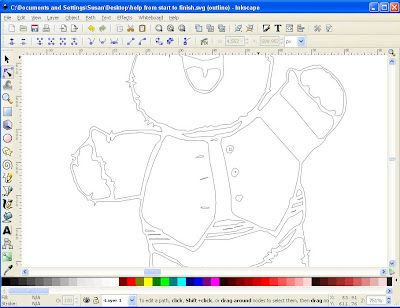
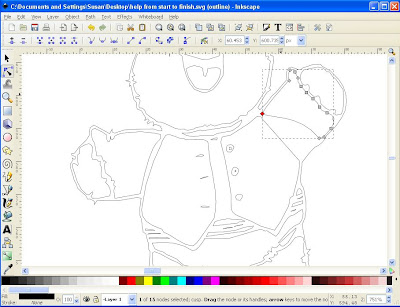
Working on the sleeve same as the other side moving the nodes
into position and draging the curves to where they look good
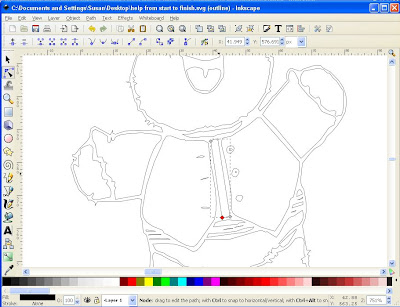
I find it easier to make new nodes do do the shaping on those
two new lines just by double clicking on the lines for each node
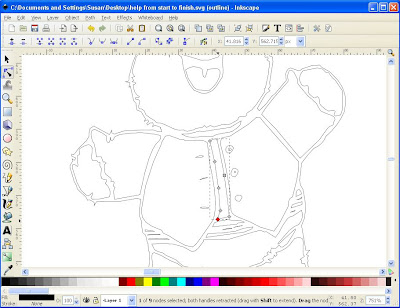
With arrow button (top left) select that piece you have just fixed and
the piece you want to join to that ( i want to join the piece under the chin)
by holding down shift
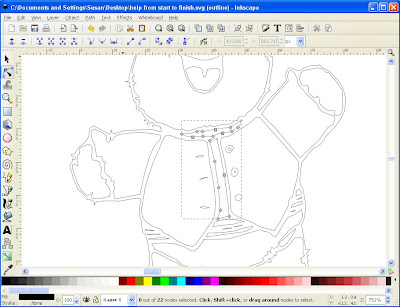
now need to but each of those apart by selecting a node near to where you
want to join them and click on it
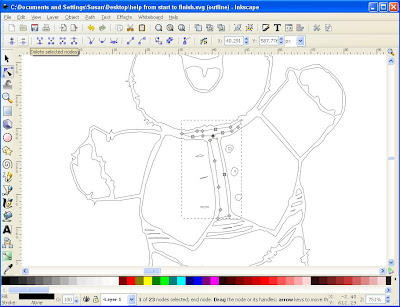
On the top of the middle section i need a new node to break the section so i doublle clicked to get a new node in the middle
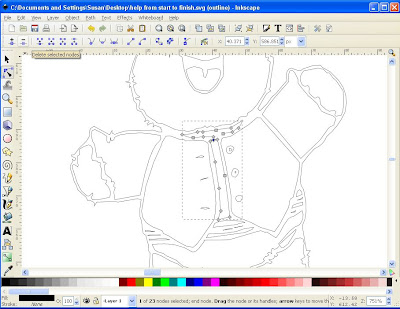
To connect the piece under the chin with the piece in the middle now
you click on the two nodes one from each by holding down the
shift key
you click on the two nodes one from each by holding down the
shift key
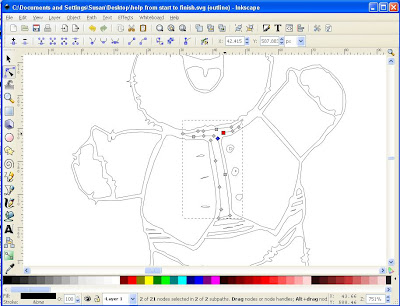
click on the join nodes with new section (fourth in from left top)
and a line will appear between them
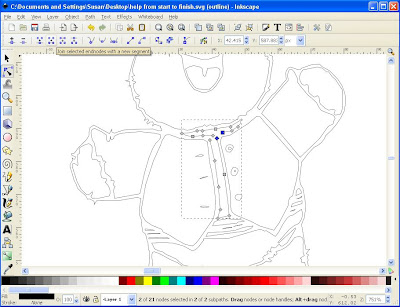
select the left hand side nodes one from each (i adjusted the
under chin node over a little so that it looked right)
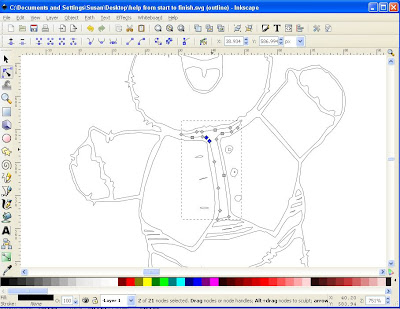
click on the join nodes with new section (fourth in from left top)
and a line will appear between them
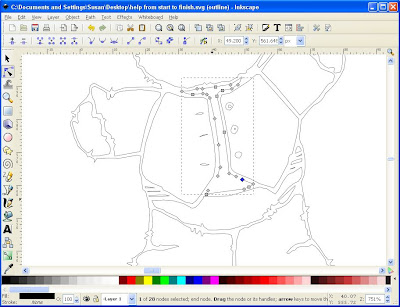
select both for joining
and click on the join nodes at selected end nodes with a new segments
(fourth from left top)
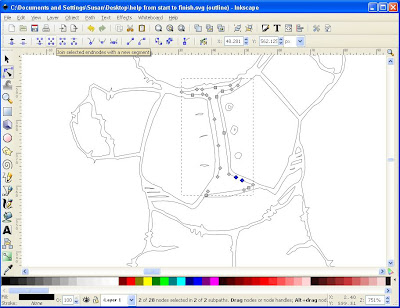
select both nodes for both center and bottom sections
and click on the join nodes at selected end nodes with a new segments
(fourth from left top)
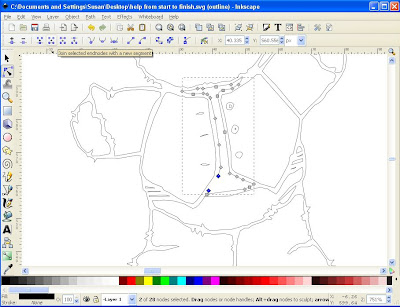
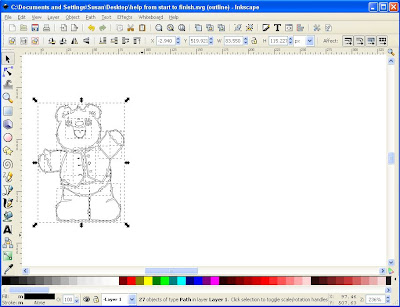
And you will see a neater result that is able to be cut and put together
and now to neaten up the side parts of the under shirt
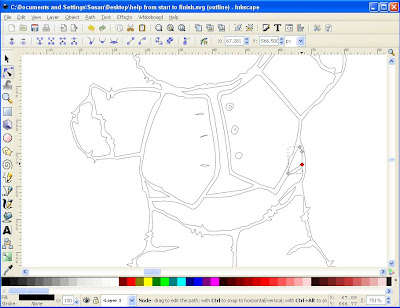

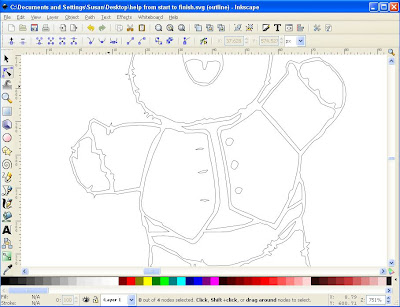
notice on the body above there is a indent on the right hand side of the body
above the leg well that will cut wrong so i want to fix that
By selecting nodes
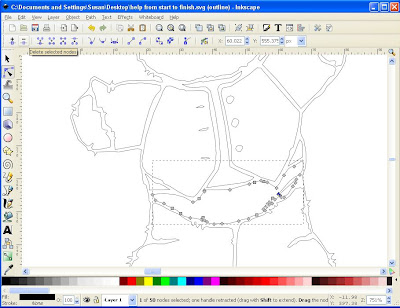
Looks better now (it is looking out for little things like
this that helps when cutting and putting together)
FROM CLEAN UP TO IMPORTABLE
Now to get this ready to import to sure cuts a lot
LETS BEGIN
you may like to save as new name for this so you have original
Now to get this ready to import to sure cuts a lot
LETS BEGIN
you may like to save as new name for this so you have original
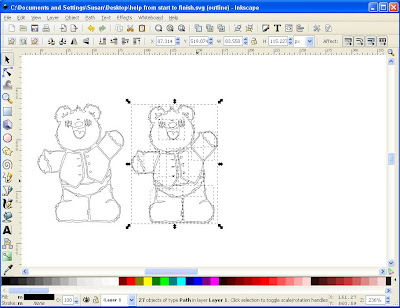 And control d and drag beside that one (i found out later for this project i did not need it but better to be safe and have it it can always be thrown away )
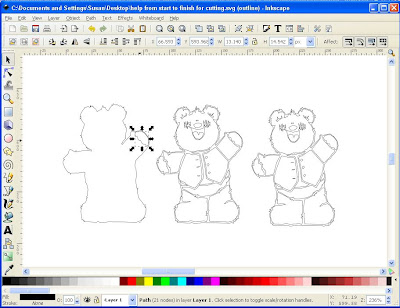 Now we will take all the t shirt out of the next image
(as the pieces are all solid pieces they can just be moved by selecting and dragging out )
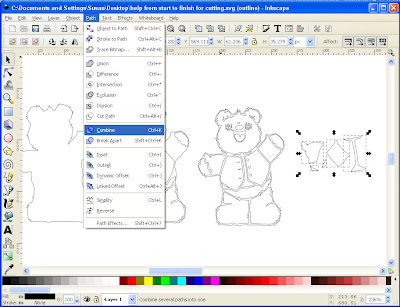
Now for the vest parts , because it is made up of all parts
like button holes and things it is here where you have to select the
whole section around all of the pieces
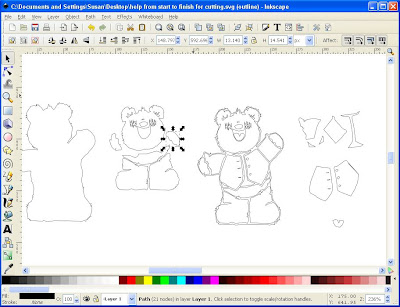
Now i did not need this for any other pieces some times you need another to get
pieces out of so i just select and control x
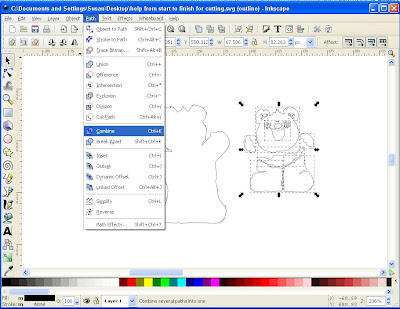
Move everything together not Too close as you need room for placing
different colours on the mat for cutting
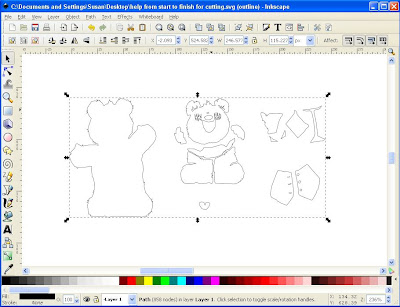
Ready for NEXT SECTION
IMPORT to SURE CUTS A LOT to CUTTING and MADE
IMPORT to SURE CUTS A LOT to CUTTING and MADE
LETS BEGIN
open sure cuts a lot
open sure cuts a lot

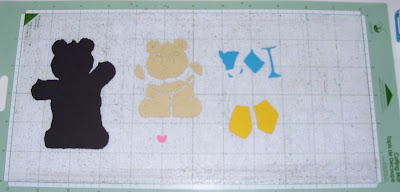
FINISHED
would really like to hear in comments if this is of use to anyone
would really like to hear in comments if this is of use to anyone








45 comments:
This is totally the BEST tutorial I have seen on how to do this SCAL. Thank you SO much for doing this, step by step. For those of us who are visual people, this helps way more then words! Thank you again for taking the time to do all that work and also have step by step pictures to go with them.
Hugs,
Jen
reelcrafts@comcast.net
Oooohh, Susan........This is fabulous! What a bunch of work and it is so very clear now. Thanks a lot. I sure will enjoy my dingbats a 1000 times more with your
lesson(s).
Allet
Susan, this is a terrific tutorial! I have been using inkscape for quite some time now and had to learn many of these steps through trial and error. How kind of you to share your knowledge and take the time to put this together! Great job!
WOW. I dont have the SCAl yet but you have given me such inspiration that I am ordering it now!
Great instructions and you make it look so easy. Thank you! Jody
Thank you so much for taking the time and effort to do this!!!!!!!! It's wonderful!!!
Thank you SO MUCH Susan. All your lessons are helping me to learn these (not so user friendly) programs. I have one question though...... How do you make a card with the scut file? Similar to your What's up Doc??????? I really appreciate all the hard work you put into this for our benefit. Thanks Again.
Donna
Susan- you amaze me!! Another wonderful tutorial and I LOVE all the detail and all the photos! I know it was a TON of work for you, so please know it is all GREATLY APPRECIATED! Well done!
THANK YOU!!! :-)
This is a totally amazing totorial! It is so much easier to understand with this visual!Thank you for all your hard work!!
Susan: As usual, I thank you for sharing your talents, your time and all of these great tutorials!!
They are much appreciated and very valued!!
Please keep 'em coming!!!
Sincerely,
Kim Sottung
ksottung@msn.com
Susan,
Wow! I had to buy SCAL after reading all your tutorials. You made a beginner feel comfortable with this program! This one is the BEST! Thank you so much for putting so much work into it. You have anew fan and will definitly visit your blog again and again. Thanks!
There are not enough words to thank you for all the hard work you do to share with us. I know it takes alot of time and I really appreciate EVERYTHING you share!
Laura
What a great deal of work you did. I certainly appreciate it all. I spent about 6 hours trying to do something similar and was getting so frustrated, so thank you.
YOU ARE THE BEST!!
We will all benefit from your hard work and sharing.
Thanks so much.
PJ
Wow! What great directions! This definately helps me when I need to be able to create my own cuts. Thank you!
Your posts are wonderful!
so helpful!
I have been able to clean up some basic dingbats and cut it is amazing i would be clueless with out your help.
Have you imported a scaned item and traced it?
some one on the cricut board showed that I have not a clue how she did that but I would love to learn.
Ramona
Susan This tutorial is just fantastic. Thank you so much for the time and sffort you put in to help all of us, especially those of us who are 'visual' the instruction make so much more sense this way! Thanks again
Julie x
Your tutorials are the best!
Thank you!
susan i keep trying all these tutorials I have found some missing items on the download of inkscape & have had to manually download them. however on this tut. when I get to the the f i can do the T and the drop down lets me choose lauries C it shows the bear I choose accept it changes back to the f it wont stay on the bear. it is always something. I can never get a full tutorial done. I keep trying cause I so want to use this program. I love your tutorials and your work. just totally frustrated.
Susan You are the best!! Thank you so much ,your tut is very interesting and you make it very clear and of course!!! did help me a lot .
Blessings,
Erika K.
Hi Susan,
thank you so much for the awesome tutorial - you did a great job and you this tutorial is priceless! It has been fun creating with inkscape. I have one ?, I save my files as DXF to cut w/ my blue wishblade after I convert them to gsd files from robocraft. I get light blue lines through out my projects. I haven't run a test cut b/c I don't know if the blue lines will cut. Do you happen to know why this happen?
Thanks,
Katrina
Thanks for the lesson...for those of us who are new, the lesson will really help. I need to be taught, I can not seem to figure things out on my own.
Thanks asain
This is awesome, EXACTLY what I needed as a new user of SCAL and Inkscape. Thank you so much for taking the time to do this.
You are unbelievable Susan! I am just glad that I don't have Sure-cuts-alot because it all just seems like a lot of work. Sure-works-alot. Glad there is someone brave enough to tackle those tutorials. I don't blame you for protecting your hard work. Anyways, thanks for sharing so much of that work.
Caro :o)
Susan, I have done tutorials for people on other websites (different hobbies entirely) and I know how much dedication goes into even a simple one. From 'watching' you go through all the various steps I have learned a LOT more that I can do with Inkscape. What an awesome program! I truly appreciate your time and generosity in providing us with this tut. We're gonna have to name you "Queen Tut"!!
Marly from SCAL forum
This is awesome, thanks so much for putting this together!
Susan,
You rock! A Million Thank yous for these tutorials!!!
I can't tell you how helpful all of the information is that you share with us!
I appreciate you!!!!
I was getting really frustrated until I found these instructions. A very big thank you.
Karen
Thank you. I did learned a few extra things. Keep up the good work. Almost all I've learned, I learned from you.
Parcha
This was an amazing tutoial!!!! I wondered about the dingbat cutting, as it made no sence to me how it was going to cut all those little lines without making just a big mess.
Thank you for teaching me a lot today!
Kristin K,
Norway
Thank you Ms. Susan, this is truely the best tutorial I have seen online. I just bought the C. Expressions and I am still a bit intimidated. I want to purchase the SCAL/inkscape on my laptop but, there again, I was intimidated.
This blog is SOOOOO added to my favs on my computer :)
Thank you! I've finally managed to create something in Inkscape.
OMG! I can not believe you went thru all that work to help us! YOu totally rock!!
Thank you so much!
This was the most helpful informative tutorial I have ever seen! Thank-you so much :) This is one that will be refered back too quite often untill I figure it all out.
Becka in Canada
You ROCK! Thanks so much...I could not find instructions on how to use the program after I bought it and I have been cutting out a bunch of outlines :-)
Thanks so much for taking the time to make these step-by-step instruction!
Thank you so much for doing this. I learned a lot! One question. Where did you get the font that you used?
You are an awesome teacher! Great job. I love your work. I really learned alot from this!
Susan,
I recently purchased scal and have no clue what I'm doing. I truly appreciate your generosity in sharing your time and talent with those of us who don't understand. I will keep coming back...THANK YOU!
cyimbugbitten
WoW, this was a great tutorial, thank you so very much for putting your time and effort into helping others understand this program.
I took a fairy, (with lots of pieces in the middle butterfly and deleted them out thanks to your tutorial and just made a simple image.
What an awesome teacher you are, I will be checking in again and again.
This was such a help to me,
I really needed this info and I paper copied it for my step by step attempt, you did a great job, thanks
Pam
Thank You! I'm pretty new to the Inkscape program and to Craft Robo. Your tutorial are so specific and terrific for we who are visual learners! (And for me--I started out pretty computer illiterate!) I never knew I could do anything with dingbats--I always thought they were just for silliness. Now, with your help, I'm about to get very silly! Trisha
I'm going to do a feature post on you again, you do SO MUCH for those in the Cricut community, it's just unreal. THANK YOU THANK YOU THANK YOU THANK YOU. The post will be up in the next few days.
Take care,
Gracie From Imagine That, formerly Everything Cricut.
thanks so much for this tutorial!!!
You have to be the most patient person in the world. Thank you for sharing your knowledge.
This tutorial IS AWESOME! It is exactly what I have been looking for. I have seen a lot of tutorials on inkscape but nothing that I understood from start to finish. Thank you Thank you Thank you! I have a ? though, When I try to path breakapart, nothing happens. I am not sure how to go to the next step. I have tried about 4 different dingbat fonts now. Im wondering if some fonts are just not capable?
Julie H.
Shadowsmom04@hotmail.com
Susan, you are an absolutely amazing person for taking the time to create all these tutorials!
Not only do you not charge us for them, but you also put up photographs for every single step which is just such a help for visual people like me!
Thank you SO much!
Weezy :)
Post a Comment