Any font cartridge you have the fonts can have many looks with just a little playing with the design studio
so here we go
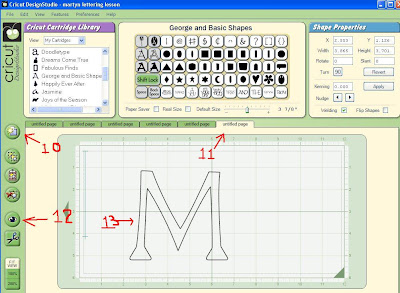
1. choose any font and size you want it
2. make sure you check the weld button
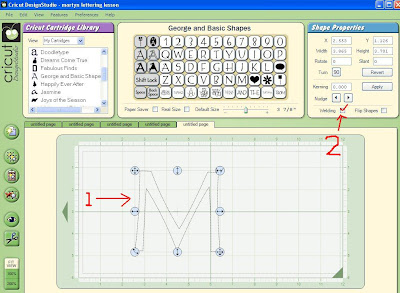
3. find a shape
4. size it to suit the end of the font
5. move into position (make sure you check the weld button)
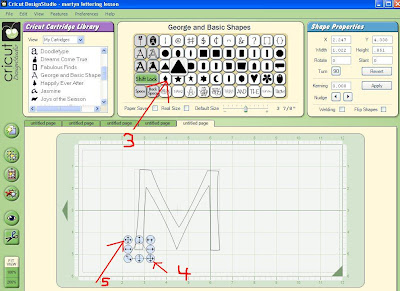
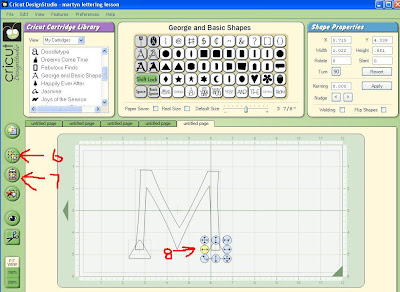
6. highlight that shape and click copy button
7. Click paste (will paste over the top of that one )
8. Now with the single arrow key move it straight across into place
9. making sure all lettering and shapes are welded
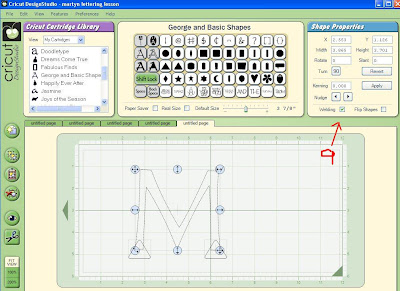
10.click on new mat
11. you will have new mat
12. click preview
13. and you will see your brand new font you made yourself
Here are a few examples
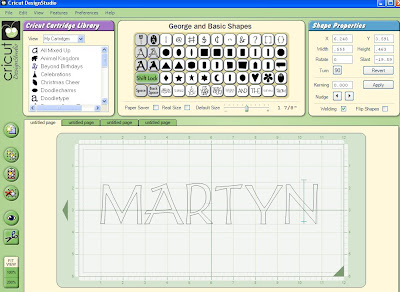
this is just the plain font as it comes on cartridge
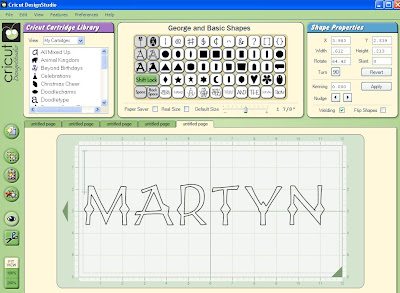
Here is it with Triangles on the bottoms

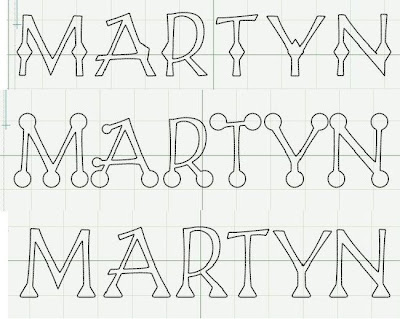
here it is with dots on more than just the bottoms of letters

AND you can use the same idea to put the shapes anywhere on the fonts to make them look very different this one has diamonds
HERE IS ALL THREE ALL THE SAME FONT BUT SPECIAL look to each

20 comments:
What a wonderful idea!!! Thanks so much!!
omg awesome awesome awesome!!!!
SUSAN YOU ARE BRILLIANT!!!!!!!!
I love the way you come up with these -- oh so logical, why didn't I think of it myself -- ideas. You prove time and time again that the only boundaries in cricutting are the boundaries of your imagination.
Fabulous.
Thanks a bunch.
Carin
this is an amazing idea, what about other letters such as B or D?
Great Idea. Thanks for sharing and for ALL of your wonderful - helpful tutorials. The time you put into this is greatly appreciated.
Susan
Your amazing!! I have spent hours here. I can't wait to start cutting!! THANKYOU AGAIN!
Wow - who would have thunk! Thanks, Donnita
Whoda thunk...bedsides you! That is so cool!
this is just too cool! Everytime I go back through your archives, I learn something completely different.
Susan your tuutorials are wonderful & so helpful.I appreciate you having this for all of us. Your great!
Hugs, Janis
http://scrappergrl.blogspot.com/
You are so brilliant! I love this idea! TFS! I will give it a try.
Great idea! Now - why can't I think of things like this? I can't wait to try it.
This is just what I needed!!!! I love the letters with the dots on them. I assume that could alsoo be done with the Gypsy as well. I may need to give that a try. Thank you so much for the great tip.
Wow!! What a great idea!! I don't have Design Studio but I have a Gypsy so I know how to do this on there!! Thanks so much for the tip!!
What a great idea! I'm sure I never would have thought of that!
Great idea!!
What a great idea. Love it, can't wait to give it a try.
Terrific tutorial - tfs!
Great idea. Thanks!
Post a Comment