Scrap Factory Expanaion Packs

Tuesday, September 30, 2008

A dazy donkey day

A lazy donkey day.
I just received the latest released donkey stamps
from alota rubber stamps
and the base of the card is
designed by LINDA at just for sharing
what i did was cut her card one in red and
then one in white slightly smaller and mounted it behind the red one

I added swirls to this one and now i think i feel happier to it


Pattern shared by Linda

BOTTLES BOTTLES and more BOTTLES

Today I am showing some bottles that I made using
some assembly required rubber stamps
(They fold flat to be posted )

I collected the labels of some real bottles
to add to the paper bottles


Monday, September 29, 2008

60 Years OLD

A week ago a friend of mine turned 60 years old,
So i got his wife to take lots of photos of the celebration
so when he receives this he can put the pictures in .


Designed in inkscape and cut using sure cuts a lot

Sunday, September 28, 2008

SWIRLS 001 pattern for Sure cuts a lot

Special notice
A few weeks ago i showed you some cards
made using these swirls and now the pattern is
ready for sharing
HERE are the examples
cut the whole mat out in purple and made

ALOTA witch KID!


then this one with the left over part on the mat

Maybe ONE MORE WITCH

Then cause i did not want to make more purple cards
at the time i used a black and coloured what was left black

Bow GIRL

and

Christmas cheer

so out of the one mat cutting i got 4 cards made

HERE IS LINK TO THE PATTERN

Christmas cheer

YOU 'RE a STAR word card

Stamp used is an alota rubber stamp .
the pattern is not quiet ready but
when it is i will be sharing it .
the card on the left is with the left overs after
cutting the one on the right

cards designed in inkscape and cut using sure cuts a lot

Saturday, September 27, 2008

How to make PAPER ROSES

"My son has a project that he needs to make
roses for so he could learn i made this lesson for him
and i thought i would share it with you as all well "
There are many of these six sided punches, in all
sizes including sizzix dies (i know i must have them all)
But i thought i would show you all how to make them
into roses
OH and also made .svg pattern for those who have
machines that use .svg's and
made cricut pattern (different size on each mat)

LETS BEGIN
If you are using punches you need three per rose cut like this .
If you are using cricut design studio you need one mat worth per rose
then cut like this
If you are using .svg you need one per rose (already cut like this )

Now with the biggest one you need to put pva glue on one wedge

and then overlap the wedge on the other side and
hold down to glue in place

do the same with the next two sizes

now with a stick you use your thumb and roll the
edges of each petal.

so they look like this

Do all three section's petals

Put the biggest one aside and the other two you cut a small
part of the point away (this is so the flower sits nice when made)

Just like this

Now add pva glue in the center of the biggest one

making sure you put enough to hold the flower together

Now put the next size down in to the glue

then add glue again and all the next size piece in there

Now with your heart shape wedge you roll the petal edges
over using your thumb and stick

And then you roll it like this

glue and cut a little away form the bottom of this wedge

then i reshaped the petal back to look good added
glue into the center of the flower and placed this in the flower

Now for the single wedge this one is done sideways
you use your thumb and stick to shape again

then you roll this from the small point to the big edge (not tight )
Then glue into the center of your flower
AND you now have a rose

If you have Sure cuts a lot HERE IS THE .SVG PATTERN
If you have Cricut design studio HERE IS THE PATTERN

Friday, September 26, 2008

Helping with paper piecing with stamps

Lesson stamp is alota rubber stamp
A lot of my card the past week or so have
been paper pieced using stamping
so here is a quick lesson on how i have been doing
that
LETS BEGIN
Stamp the image on the main mat (white in this lesson )
and on all the scraps of paper (can be pattern paper)
to make up the whole picture
Stamping the full image on the back most colour
(when i am doing a person it is the flesh colour)

Cut the full image in the back piece (flesh)
and then the other pieces hair, dress. and so on .......


Now you start layering them in place

When i cut the boys hair i cut that so as it was most of the hat
as well so it was easier to use

continue to piece the pieces in place
till it is all in place

then paste that on the top of the main picture

and then onto the complete card
REASONS for doing this
  • So you don't have to colour by hand
  • So you can match perfectly with colours on your card
  • So you can use pattern paper in your image

HERE ARE Some samples using this lesson

ME and my TEDDY

Hi There (link links no 1)

Play time (Link links card)

Plane Balloon (link LINKS card)

COW gardener (LINK links card)

FLAMINGO (link LINKS card)

HAPPY Elephant (LINK LINKS card)

Summer is coming

HELENE with her teddy (LINK links card)


Thursday, September 25, 2008

Special notice Happy birthday card has pattern now

Special notice
Happy birthday card has pattern now
If you have sure cuts a lot and want the pattern
for the birthday word card pop on over to the
link below and it is now there .

HAPPY Birthday word card

It is a .scut pattern but you don't need special fonts

installed as it is self contained

How to photo corner mats with either scal or punches

My cards the last week or so have had
the images on the card using photo corner .
So i thought i would take a few minutes to share this
Also i have made two .SVG patterns
one square and one retangle set.
LETS BEGIN
if you have sure cuts a lot here is what i do
i import the .svg file into the program
and then place the card stock on the mat according
to where they are needed
And cut

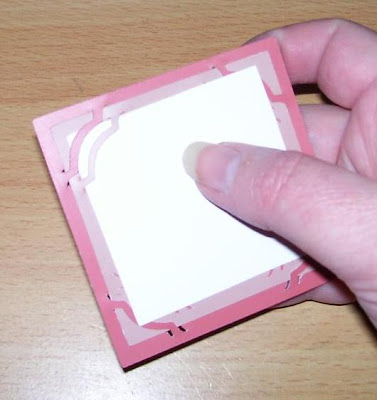
now you take the biggest matting and weave the middle size
on in

On all four corners

Then take the top one (image should be on this )
and thread that through both corner strips

And now it is ready for the card or scrapbook page
If you what .svg HERE IS THE PATTERN for square one
AND
HERE IS THE PATTERN for rectangle one
NOW LETS LOOK AT IT DONE WITH PUNCHES
Cut your layers having checked your punch how much
it needs to be smaller for each layer , as all
punches are different

now you punch all corners of the bigger one

and punch the corners of the middle size one

Now thread the middle into the big one then put in the top one(image)
threading through both corners

Ready to mount onto card