
WEEK FOUR wow time is flown and I still can not find one button on my Zing, it must have one but i cant see it ! What button is that you ask? the OFF button LOL .
This past week i have been surfing the net and thought i would do a week of things from the web.
This past week i have been surfing the net and thought i would do a week of things from the web.
BUT FIRST a tip *that I should have said last week sorry
If you are going to use the pens for drawing with the cross hatch and plan to use different colours in the one drawing you need to cut using the WYSIWYG for cutting that way when you change the layers it does not end up all in the one place on your mat
OH and that you use the same size barrel pens in the one project, so the "off set" is in the same place and the draw right .


NOW for this week
I am normally a person who likes to make my own pattern or put my own spin on the idea of someone else's projects. But this week while doing lots of surfing to work out things to do I came across things that I would like to try making, so I thought i would.
I love slice forms and one person who does make great sliceforms is
Jenigami by Jennie Bean crafts so while i ordered her Cd's and waited for them to arrive. I Got some of the freebees of her website and made a few of them .
These 2 are the Squirrel BUT i cut there tails and made them into rock wallabies as we have them in Australia


and made two apples


Before long (wow did not take long) the cd's arrived , so I made the bath tub and bird cage so far , Using inkscape to separate parts to cut in different colours first.


While surfing the internet and looking a youtubes I came across someone that was making her cut files for her heading on her scrap page and was giving her font a box shadow and i liked how it looked so I went straight to first make the cut to see if that program did the same sort of thing and then after finding none on that I went into inkscape and could not find it on there either. BUT that did not stop me I thought i would play around with it and find the best way to make it myself.

Which was quiet easy.
So I thought I would make this card with that idea using an alota stamp to complete the look.
Up until now I have just been making my shadows as a complete shaddow all way round the letters but i love this look and found that it looks best on letters that are more squared than rounded.


HERE it is on rounded letters and although it still looks great i did like it on more squarer fonts
(the two chefs are alota stamps)


If anyone would like an inkscape lesson on how i did these drop shadows please leave me a comment asking or email me and i will make one.
In the past i have cut using dingbat fonts , but while i was looking at DaFont seeing what other fonts I could use with the drop shadows I got a little side tracked and came across this Panda font so i downloaded that and using the letters "g" and "h" i made this card (used inkscape to take away the bamboo to cut the white to put behind the pandas)


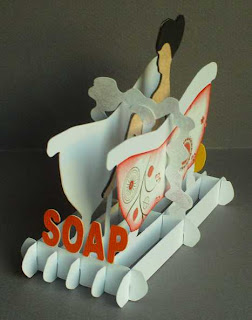
Then thinking that was enough for the week, I went surfing the net yesterday and came across this site and found these wonderful rockets and knew I just had to make!
Firstly the pattern is for thick foam so you have to teak the pattern for cutting for card stock other wise the slits are too wide and the rocket falls apart


I am of to explore some more.
If you live in Australia and New Zealand
and wondering where you can get a KNK Zing
SKAT KAT is the place to find them
4 comments:
Hi, Susan. I really like the slice forms. I've never considered making them. They look like so much fun and will be a great thing to make for my students at school. I would LOVE a lesson on inkscape. I hardly ever use my cutter and need to learn how to use it more fully (I have an "old" Silhouette SD. THank you!
Sally in Stockton
Hi Susan...
It's a nice post!
Love the slice forms. Great work.
Susan, thank you so much for making my retro rockets in a different medium! They look very nice, love the way they came out! This reminded me that I need to post another similar rocket I made a couple of years ago but never posted (also for 2mm craft foam though).
You've also inspired me to dust off my old Silhouette paper cutter and try something on it - this is how I came to laser cutting the foam in the first place - the Silhouette kept jamming the paper and I started to look around for a ways to cut flat material without dragging a knife through it. But I have been doing various paper-based 3D projects since I was a small boy (i.e. very long time ago) and you've inspired me to give it another try.
I also have a miniature rocket posted on my blog ( http://elabz.com/cnc-files-for-bumblebee-the-miniature-laser-cut-rocket/ ) though I'm not sure how the thin landing gear will come out right on a paper cutter. You have so much more experience with paper cutting, if anyone can pull it off, it would be you.
By the way, did I mention I am a huge fun of robots, too? I collect educational robots from the 80s-90s as well as toy robots and the centerpiece of my collection is also a blue robot? What a coincidence! Too bad I can't post a picture here :)
Anyways, keep up great work, I'll be sure to come back for ideas as I'm getting my paper cutter back in the game.
Cheers!
Dmitriy
Post a Comment