NOW before you read on I have to say this is the way I DO it there might be other ways.
OH and i do not work for cricut or provo craft this is just to help my cricuting friends out.
I have many samples like this on my blog and many people want to how to make them.
check them all out .
1. Start with cartridge of choice and nothing highlighted
2. Now make sure you default is at the size you want the lettering (1" in my card)

3. placing the on the page
4. the default will remain the same
5. I place mine individually (but you can place them all together)

6. Now you get another layer mat
7. Highlight the shadow key
8. Leave default at same
9. and place all letters you want i place mine all individually this way you have the option to tilt some slightly if you want.
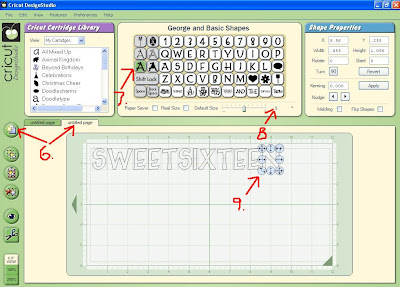
10. Now move them into roughly where you would like them on the card
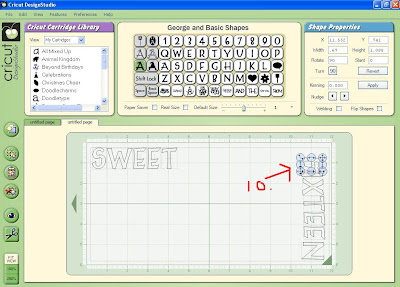
11.continue till they are in place (roughly at this stage )
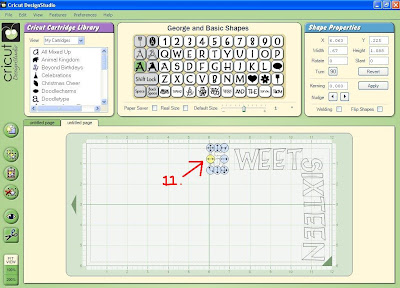
12. select the square (most cartridges have squares or rectangles you can use for this) if using the george cartridge highlight shift
13. Place a square
14. click weld
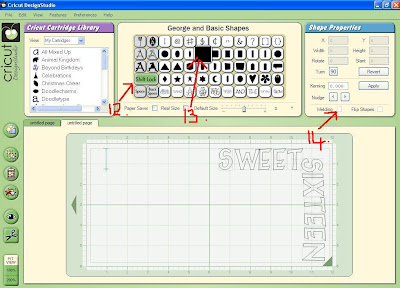
15. Move square to the side of the mat that the letters are on
16. Move square till just the left hand side of the middle of the mat
17. use all arrows to adjust it to the size that you need 9be careful not to go over the cut area of the mat (which is smaller than the mat )
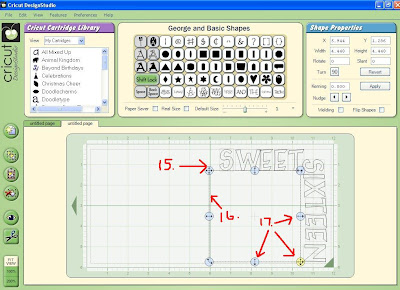
18. Move the letters to your square so they JUST over lap the square
19. making sure you weld each letter
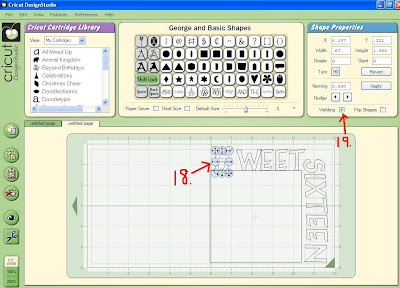
20. Till they all look like they are in position
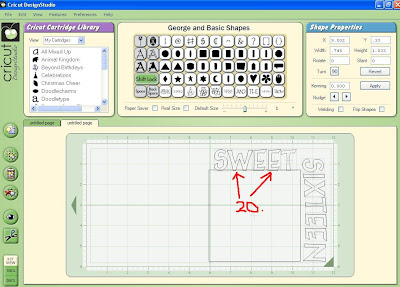
21. check that you remembered to weld the square (i am always checking LOL)
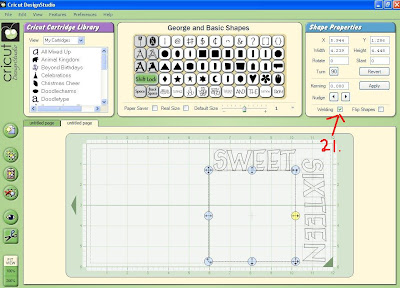
22. And continue with the side letters remembering to over lat them slightly with the square
23. And that they are welded
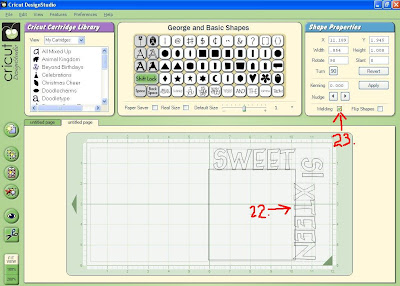
24. Now go back to first layer
25. right click on the mat and dialog box will come up go down to include page in preview click on it and it will turn tick off
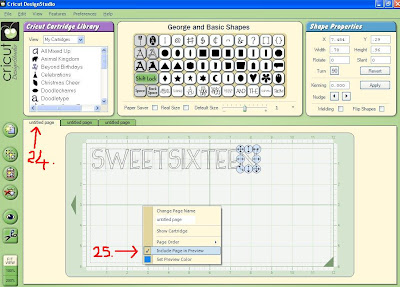
26. Get yourself a new layer mat (as in no. 6 ^)
27. Push on the eye (Preview)
28. And it will show you how it is going to cut and you will see if your letters will be attached or cut off
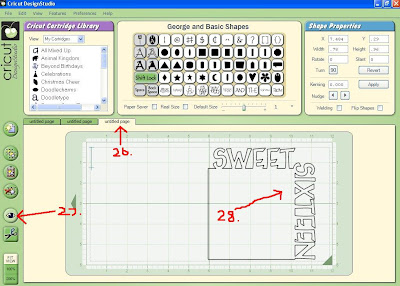
29. back to middle layer
30. and square
31. with the weld on
32. Add a square on your mat
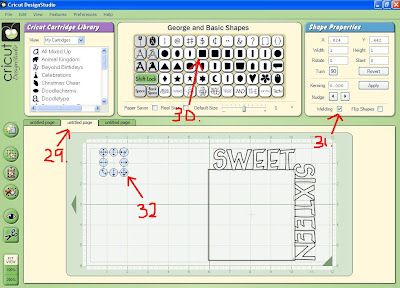
33. Size it so it goes up to the very center line
34. and overlaps the other square at the bottom using the arrow keys
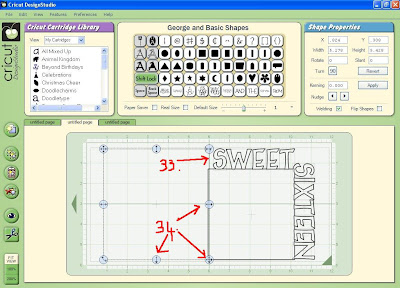
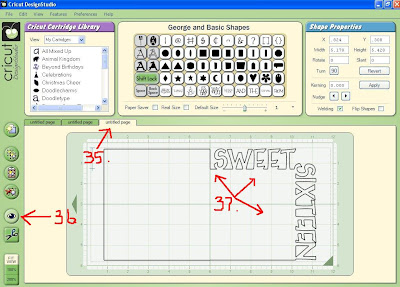
35. Go back to last layer
36. Push preview button again to refresh it from last viewed time
37. And you should see that everything is joined and not going to fall off
38. Re-Name the layers first on "top lettering " second "base card colour" and last Don't cut (don't know how to delete this page so easy to just write don't cut ) TO FIND OUT HOW TO DO THIS GO TO MY OTHER LESSON
39. I just arranged the top lettering to save paper
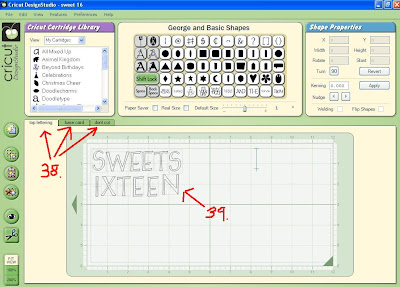
COMPLETE Hope this helps all that have been asking for a lesson on it sorry it took soo long after the first requests came in.
IF you have a cricut and the cricut design studio HERE IS PATTERN

10 comments:
Thanks so much for all your help! My daughter is turning 16 in March. This will be great! I really appreciate it!
don't know how to delete this page so easy to just write don't cut
To delete a page, just make sure you have that page open, and hit Control-D or go to View-->Delete Page.
Thanks so much for all your DSS tutorials! I know the welding/shadow one will come in handy a lot!
Susan,
Thank you so much for your wonderful instructions on the Sweet Sixteen birthday card. You explained it very well.
I didn't see the cartridge listed on the download. Can you tell me what it is. I like to list it in the file.
Again, thank you for your hard work.
Joan
You are a blessing! Many thanks!Made using CDS much easier and faster then I probably would have done on my own.I think Cricut ought to hire you on as I am sure you have helped keep their tech support lines to a minimum on this.
Donna B
This is an awesome card! WIll have to get my daughter to try to cut one of these for me. Thanks for sharing.
Sandy W>
Susan, thanks so much for your easy to follow instructions! I'm getting the hang of it and having a BLAST! You're a GEM!
Thank you so much for posting this lesson. I was able to make a similar card with Alphalicious. It is posted on my blog Scrappenings with a link back to your blog. I hope you like it.
Thank you so very much for the lesson. Wish I would have known how to due this lst October when my daughter turned sixteen, she could have gotten a real nice card instead of a store bought one.
thankyou so much for this file.my eldest granddaughter is sixteen in 2009 and i will use this for her nirthday card.ellen xx
Thanks Susan, I had so much fun with this tutorial this morning. I followed it to the T and made a very cute small scrapbook for a friends little girl. I put the letters of her name on the edge of the pages.
Yopu're the GREATEST!!!!!
Sherry
Post a Comment