Scrap Factory Expanaion Packs

Tuesday, June 12, 2012

WHOoves and my adventure week 17 with the ZING

Week 17 of my Zing adventure
This week was a mixed bunch of things due 
to making lots of things  for a 21st birthday 
present.
( I learned lots about  ponies this week)
This pony was one that i learned lots about 
He is Dr WHOoves 
Found a clip art on the net and used inkscape to 
turn into a cut file and mtc and Zing to cut 
using my FAVORITE font at the moment 
called YIKES
Knowing that part of her present I wanted to 
give her 21 coins (5 cent coins ) I made 
a little 3D box with a triangle holder 
for the coins . The dr whooves in on both sides
of the box 


While watching one of the Make the Cut 
webinars I seen that someone had made a 
box using a mickey mouse head and 
turned it into a shaped box. So i thought I 
would give it a try  using the Dr Whooves 
UGG i should not have tried it as it was not 
easy to do BUT was soo happy with how it 
turned out 

Surfing the net to see who this pony was 
I came across this pattern for a 3D pony that you print 
and cut and put together HERE  But i wanted 
it to be all cut out in coloured card stock so I tweaked 
it in inkscape making it into a cut file  and then took
to make the cut and cut out
(oh and it fit in the box that i made too )


To keep the theme going I brought a Tshirt and 
used heat transfer vinyl and made a tshirt for her
Then I used the glass etching cream and did a 
glass for her. This is not perfect as it was only 
my 2nd ever attempt at playing with it 
But soo happy with the result

Thinking that was going to be it I then was playing in 
inkscape and thought oh a hoody jacket would look 
great so i designed it and seen how it would look
 Below is a picture from inkscape
Sadly i could not buy a hoody in a suitable colour and
size but I did manage to get a windcheater  the colour 
and size. so i inkscaped and redesigned the idea
picture below from inkscape .
Then i took the parts from inkscape and cut in 
make the cut and the Zing.
AND here is the result
HAPPY 21st BIRTHDAY Rachel 
Here she is less than a few minutes after 
opening her presents from me 
She loved them all so much 
It was a big week for Zing I sure did make 
it work hard.  Need lots more practise with 
the vinyl and etching cream.
But soo happy how everything turned out 
and Rachel sure was happy too 
(she is both the ponies and Dr who fan)

The ZING is here to stay!!
I am off to COUGH explore some more.
 If you live in Australia and New Zealand 
and wondering where you can get a KNK Zing 
SKAT KAT  is the place to find them
 would love to hear what you think

Sunday, June 10, 2012

Alota Rubber Stamps Design Team Call

Here are the details of the call:

Alota Rubber Stamps Design Team Call

Design Team Requirements and Expectations

Most important, have a passion for Alota Rubber Stamps

You must have an active blog and Facebook page. You must be proficient in uploading photos to your blog.

You must submit 1 card or project to me and on your blog each week… The card MUST have Alota Rubber Stamp ONLY.

Email a photo of each card or project so they can be place in your gallery on our site

I do require you to send me the actual cards so they can be use at conventions and or for the promotion of Alota Rubber Stamps.   They may be mailed weekly or monthly

Active (clickable)  Alota Rubber Stamps logo must be placed on your blog.

Links to the stamps used on your cards when you post them on your blog and on entries to promote stamps used. If you belong to any other groups please feel fee to post your cards.

Make an announcement on your blog for new releases and sales

Be an active member in the Alota Rubber Stamps Challenge Blog at www.alotarubberstamps.blogspot.com and host a challenge of your choice rotating with other Design Team Members.

Also be an active member of the Alota Rubber Stamps Facebook page.

Photo of yourself and a brief bio that will be in our Design Team Gallery


This is what you will expect from me.

I love to show off my Design Team artwork and will always give proper credits

You will have a photo along with your bio on my web site with a clickable link to your blog.

A gallery where only your cards will be highlighted when a visitor clicks your name.

Now for the good part…

I will send you a Design Team package of stamps about every 8 weeks to create your cards and projects.

Sometimes I will send specific stamps that I want you to use on a card.  Other times you may use any of your “Alota” stamps you might have on hand.

At times I will ask you to shop for the stamps to create a card of your choice…This of course will be a treat for you from Alota Rubber Stamps.

When there is a new release each member will receive stamps. Most likely everyone will get the same package but sometimes they may be different.

20% discount on your rubber stamp purchase at Alota Rubber Stamps

Application Details:

Submit, by email, 4 card samples. PLEASE send samples that you feel are your best work. If you have Alota stamps  of course we would prefer to see those, but if you don't already have Alota stamps then anything you have will be fine.
Include a link to your blog  and/or gallery
Include a list of any other design teams that you may be currently serving on or have served on in the past.
Tell us a little bit about yourself and why you would like to be on our design team.
Send your application to info@alotarubberstamps.com by June 16th with “Alota Design Team submission” in the subject line.

Friday, June 08, 2012

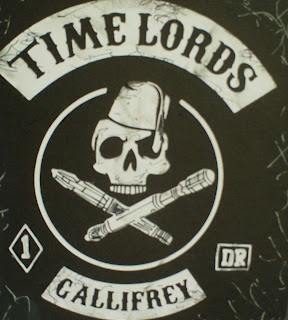
Time lords /sons of anarchy

My son asked me to make his best friend a 21st
Birthday card  and sent me this design  to use on it.
I sat for a while looking at it wondering how I would 
make it then i free hand traced it in inkscape and 
then thinking how I would so all the black work 
on it. What I did was I cut in white getting the pen 
on the zing to do that part then before i took of the mat I 
used a black inkpad  and a black pen really lightly .
He was happy how it turned out 

 Designed in inkscape and cut on the zing

I am off to COUGH explore some more.
 If you live in Australia and New Zealand 
and wondering where you can get a KNK Zing 
SKAT KAT  is the place to find them

Wednesday, June 06, 2012

Postage Stamp Lesson in make the cut

I am here today with a quick lesson 
on making a quick and easy Postage Stamp 
using make the cut 
LETs BEGIN
(Click on each picture to see the bigger image)
Would love to hear what you think

Tuesday, June 05, 2012

A weeks adventure with the Zing (week 16)

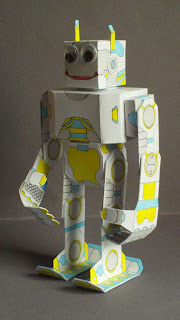
Sitting down to write week 16's adventure story. I sit here wondering what i have been  up too. (besides all the pop lock robots i made  (shown during the week)). (and still not being  well with Whooping cough)
Well I spent a lot of the time watching videos  of how too's about the make the cut software. having working with inkscape for over 7 years  I never really  thought about learning mtc I thought I could do it all in inkscape and save as svg's .
But after watching I have learnt that they both work really well together and it was a good thing
that I am learning mtc now. I found that I had lots to watch and each one I have  watched has giving me a little more insight to it. One other thing I did do after last weeks  catchup is I relized that I had a book with  cd of patterns that the same person who made the  robot paterns i have been playing with over the past  few weeks. So i got it out and tweaked one of the patterns to be a cut file as well. Below is the result. I used the pen adapter and embossing adapter (to score) and then cut. Adding a bit of colour here and there  to give a special look.
Now even though it was not as easy as getting the pattern putting in MTC  and cutting on the Zing.  I did have to take it into  inkscape and tweak it to work with MTC .
BUT IT WAS ALL WORTH IT
Here is my take on Josh's robot
 

The time spent setting it all up in inkscape was 
well worth the effort  coming up with three files
a draw file, score file and then cut file made 
my life soo much easier when it came to putting 
the model together .


TIP
Don't be scared to patterns to cut on your Zing as it is well worth 
the time spent tweaking it will open up a whole new
world for your Zinging
The ZING is here to stay!!
I am off to COUGH explore some more.
 If you live in Australia and New Zealand 
and wondering where you can get a KNK Zing 
SKAT KAT  is the place to find them

Monday, June 04, 2012

Poplocks (part 5 of my take on them)

The past 4 days I have been showing the 
Poplocks and my take on them  
If you have not guessed I did have some 
fun with these and they are soo much fun 
here i am again today to  show another.
I used not only the 
Zing and the embossing tool and I 
also used the pen holder tool . 
then afterwards I added the colour with 
my copic markers by hand
these great 
robot things from PaperPoseables 
Josh released these Poplocks Super Combiners
That you can interchange and make great things.

With the poplocks that are used to connect 
them together there is no need to glue 
easy put together and easy pulled apart.
Poseable too.
Tweeked in inkscape and cut on the Zing
 (Although it does not come cutter ready
they are soo much fun it is worth tweaking)

I am off to Cough explore some more.
 If you live in Australia and New Zealand 
and wondering where you can get a KNK Zing 
SKAT KAT  is the place to find them

Sunday, June 03, 2012

Poplocks (part 4 of my take on them)

.
The past 3 days I have been showing the 
Poplocks and my take on them  
  and Part 3
So here i am gain today showing another.
I used not only the 
Zing and the embossing tool and I 
also used the pen holder tool . 
then afterwards I added the colour with 
my copic markers by hand


these great 
robot things from PaperPoseables 
Josh released these Poplocks Super Combiners
That you can interchange and make great things.

With the poplocks that are used to connect 
them together there is no need to glue 
easy put together and easy pulled apart.
Poseable too.
Tweeked in inkscape and cut on the Zing
 (Although it does not come cutter ready
they are soo much fun it is worth tweaking)

I am off to explore some more.
 If you live in Australia and New Zealand 
and wondering where you can get a KNK Zing 
SKAT KAT  is the place to find them

Saturday, June 02, 2012

Poplocks (part 3 of my take on them)

The past 2 days I have been showing the 
Poplocks and my take on them  
So here i am gain today showing another.
I used not only the 
Zing and the embossing tool and I 
also used the pen holder tool . 
then afterwards I added the colour with 
my copic markers by hand


these great 
robot things from PaperPoseables 
Josh released these Poplocks Super Combiners
That you can interchange and make great things.

With the poplocks that are used to connect 
them together there is no need to glue 
easy put together and easy pulled apart.
Poseable too.
Tweeked in inkscape and cut on the Zing
 (Although it does not come cutter ready
they are soo much fun it is worth tweaking)

I am off to explore some more.
 If you live in Australia and New Zealand 
and wondering where you can get a KNK Zing 
SKAT KAT  is the place to find them

Friday, June 01, 2012

Poplocks (Part 2 of my take on them)

Yesterday I posted the poplocks part 1
and I am back today to show the same 
poplock but this time I used not only the 
Zing and the embossing tool BUT I 
also used the pen holder tool . 
then afterwards I added the colour with 
my copic markers by hand


these great 
robot things from PaperPoseables 
Josh released these Poplocks Super Combiners
That you can interchange and make great things.

With the poplocks that are used to connect 
them together there is no need to glue 
easy put together and easy pulled apart.
Poseable too.
Tweeked in inkscape and cut on the Zing
I am off to explore some more.
 If you live in Australia and New Zealand 
and wondering where you can get a KNK Zing 
SKAT KAT  is the place to find them