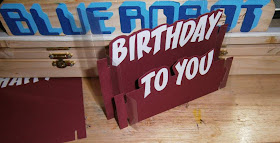
Today was a big day for me I have just finished doing my
first demo of this sliceform display card on the Make the Cut
Webinar. I taught how to make this pattern from scratch (part 2 to follow)
and then share the pattern in the Make the Cut gallery.
Here is a lesson from after the pattern was made and how to
put together.
First you open make the cut and click on gallery
type in "Sliceform Display card "
You will find my shared pattern
Click on the download button and save to your computer where you
want it
It will also open in your Make the cut.
Cut out all parts and make up each layer adding the lettering
to them before putting the card together
Start with the front on and one side piece slot the bottom
slit in
then carefully bend the slide as to hook it over the top slit
(try not to crease it )
Do the same with the other side
No with the middle layer slot the bottom in the side panel
Slightly bending to hook the top slot
(try not to crease)
Do both sides
now you have two layers done
Now do the same with the back layer, slotting at bottom first
the bending inwards and tucking the top slot in
Do this on both sides and you have now got a finished card
With demention
Even folds flat for posting
Besure to come back tomorrow (hopefully) to see part two
I had fun doing the demo on the webinar once i got over
the nerves (thankfully did not take long)


Susan, Thanks so much for sharing. The tutorial you did was amazing. Easy to understand. And the samples you showed us of what we could do was inspirational.
ReplyDeleteSue
Upstate NY
Thank you Susan for your wonderful demo last night. You did a great job.
ReplyDeletePenny
Albuquerque, NM
Thanks for a great tutorial on the webinar last night! I'm going to enjoy using the file you shared of the demo real soon.
ReplyDeleteYour tutorial on the webinar last night was great! Thanks for sharing the file also. Now I am printing your tutorial so I can read and follow directions! Can't wait to try this. This is my third try to post a comment--let's see if it works! LOL
ReplyDeleteThank you so much for teaching me so much!
ReplyDeleteYou did a great job teaching and I am looking forward to your next lesson. Thank you for sharing!
ReplyDeleteVeronika44
It was so great to hear you on MTC, thanks for the tutorial. You're the best.
ReplyDeleteSandi