HERE is another lesson I thought I would share with you
(I have roughly made all pictures for use in this lesson
needed somethings quick and did not want to use copyrighted stuff)
LETS BEGIN
This is good for if you have patterns you want to
turn into cut patterns that you have scanned or found on net
OK pretend this is a pattern i have scanned
and now want to turn it from a jpeg gif pdf or other
if i import it into inkscape and then bitmap trace for clean up

Sometimes you will find just a simple design such as i have here
has soo many nodes it is far to hard to clean up and check that everthing
is connected for cutting

So what you do instead of bitmap trace it
just import picture Then go down the
bottom of window and LOCK the little padlock (clicking on it )

Start at one point of the design and click (ONLY ONCE)
then across to the other side and click (ONLY ONCE)

So I can see this better while it is selected i then change the colour
of the black lines to another colour different to the one on the
first layer (RED for this one)
I just drag a colour and drop onto stroke

And your object will turn red
As you can see it is not the shape that is on the
locked layer but here is what you do now

Then all you do is grab the lines and move them into shapes between the
nodes it is easy moving lines between nodes you just shape it by move your
curser along the line
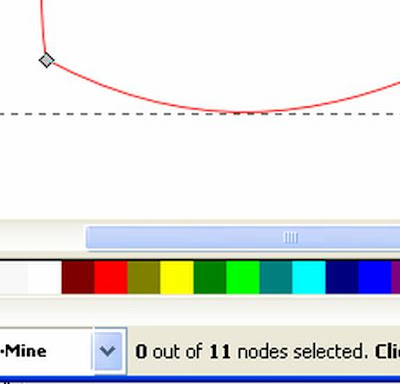 THE END OF THAT PART
Now if you had pattern in which you wanted to do
And it was like for stitching instead of going into a
paint program and removing all the stitch lines and cleaning up
Here is what you do
LETS BEGIN
I hand drew this and it is soo not straight but that was good i left it as
it was an extra lesson for you
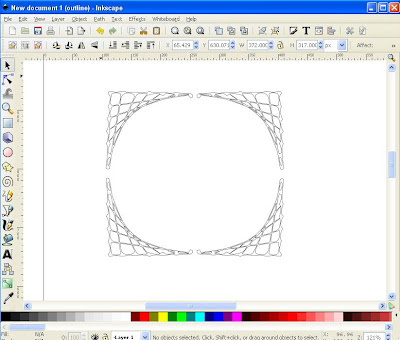
Easy fixed lock that layer and add layer to work on
Get a circle to match the holes you want it to cut
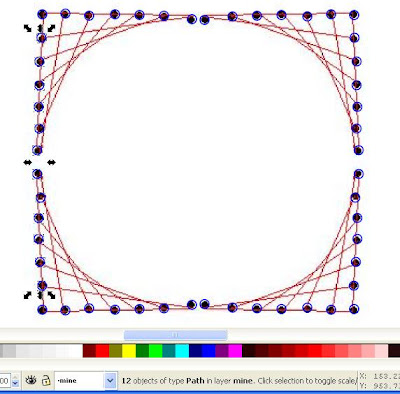
Delete the layer one as shown in first part of the lesson
and you have your pattern READY TO CUT
(well if it was a store brought one this one is so not straight BUT
easy fixed)
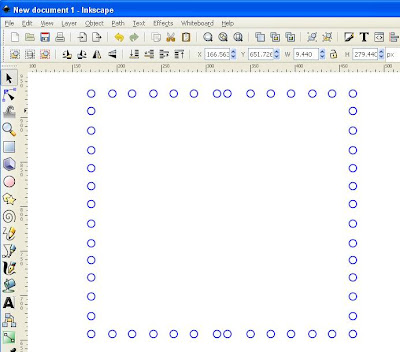
Though the two in the middle i am not happy with so i
can show you how to fix that Highlight top row and click
make horizontal gaps between even
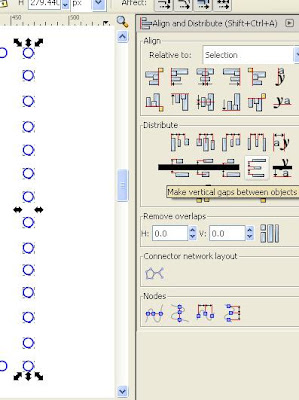
NOW they stitching pattern is all even ready for cutting
This was to show you that you can make your own things
easy and clean them up soo easy
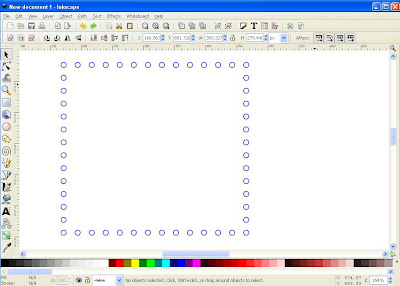
END OF THIS PART
NOW what i have found is a lot of patterns
found on the net that are made using
pdf when you import them and
break them apart or ungroup (which ever is needed)
That some break apart in to so many pieces that the lines are all
in millions of pieces around the piece you want to convert
SO this is another lesson to follow on with the last three parts
LETS BEGIN
You have imported the pdf file so you can check and convert
to .svg for cutting
well first thing is recommended is to check
that the things will cut right and how you do this is to
take away the "score lines" and then to check that all
outside edges are all in one piece

Easy to check I ungrouped and wow it was alll in lots of
pieces (which would mean conecting this at every NODE
so as it cuts right (this one being little is fine but when you are
making things like i have been doing over the past week example like the
robot with 100's of nodes to join and make sure they are all joined ))

So what i do is i turned this to a
red outline colour and LOCKED this layer
and got a new layer called it MINE


Your tutorials are priceless. You explain everything so simply and your diagrams are amazing. Thank you so much for taking the time to share your wonderful talents with us! I have learned to much!
ReplyDeleteyou have given me some of the tools i've needed to be able to use these awesome programs we have!! i've always admired your work but haven't had time to try everything. i know if i would just practice the things you demonstrate, the process will begin to get easier and the creative juices flow!! thanks much - alice
ReplyDeleteHow would I learn anything without you?
ReplyDeleteWOW -- you make this so much simpler than I thought. I like it when it is broken down step by step! Thank you very much!
ReplyDeleteWow!! Thank you for all of the work you have put into this tutorial! THANK YOU!
ReplyDeleteI wish I would have taken the time earlier and read your tutorials. It would have saved alot of hours...lol Thank you so much!!
ReplyDeleteLisa
Surely you never wonder why we ask you for so much. !!! Your tutorials are wonderful and easy to understand. Thank you for caring enough to help. This makes things fun.
ReplyDeleteThank you so very much for this. I just used it to make my first file in inkscape and was amazed at how easy you made it for me. I have been almost afraid of the program, now I am off to make more files. Thx, thx a million!
ReplyDeleteThank you, thank you, thank you
ReplyDeleteI just took a clip art that had poor lines (bit trace didn't pick up half of them) & got it to work - this is really going to help my scrapbook (&word books)