Making circle scallops even and easy
OK there might be other ways i have tried many but i found this easy for me
LETS BEGIN
you may remember the first part of this lesson from another lesson
LESSON on using the ROTATE button
OK there might be other ways i have tried many but i found this easy for me
LETS BEGIN
you may remember the first part of this lesson from another lesson
LESSON on using the ROTATE button
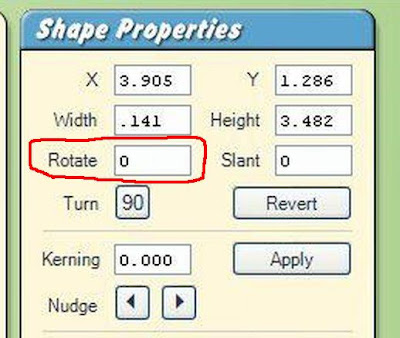
1. select a shape 2. I place on the mat and make it the size i want it 3. Make sure you have it weld checked You don't need the weld checked for this
lesson as they are going to deleted later 4. and click the COPY button
lesson as they are going to deleted later 4. and click the COPY button

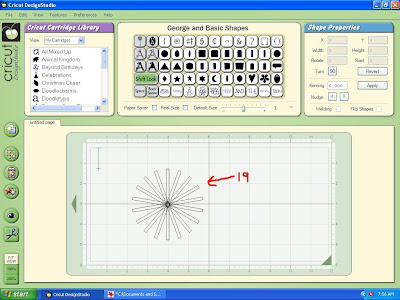
5. Click the paste button and it will place directly over the first on 6. Now type in 20 on the ROTATE and click enter

7. it turns 8. click paste button again 9. it will paste one on top of the first one again 10. type in 40 on the ROTATE button and press enter on keyboard(this is what i have choosen to do go up by 20's it all depends on what you want to go up by)
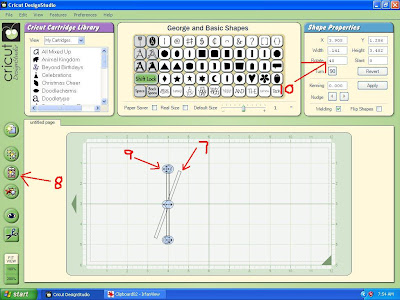
11. it will move to the 40* mark for you
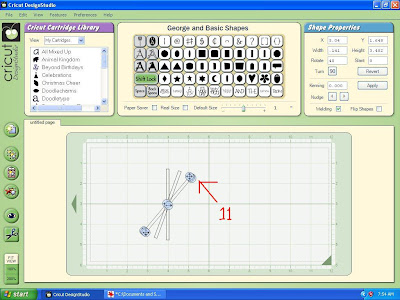
12. continue pasting 13. and going up by 20*'s 14. and they will keep going round evenly
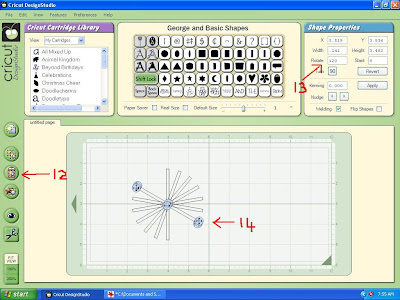
16.continue pasting 17.and going up by 20*'s 18. till you put the last one in (which will be 160*)
 Using the little cross in center of circle place the cross to the
end of the first straigh
IT is at this stage you work out what size circle you need
making it smaller or larger if needed
(will still need to tweak that as we add others maybe)

Copy and paste and then move the pasted on so that
the center cross is at the end of the next straight
(seeing by eye if they touch and over lap slightly)

Copy and past another and then move to next straight
NOTE THIS STAGE will save a lot of work later on
HERE IS WHERE YOU have to make sure before going
too far that the circles are going to be big enough
(preview will help here. if the preview shows that it
does not weld adjust the size of the first one a little delete
the other two and re copy and paste two more and check again )

Now having worked those three out now you add the circle
to the other end of the first straight. lining up the cross in center of circle
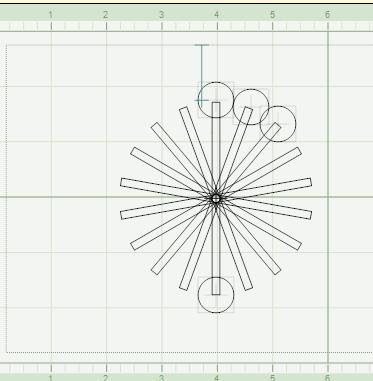
This is what has saved me heaps of work now i
add a temporary circle around my circles so
it makes it easy for placement of all other circles
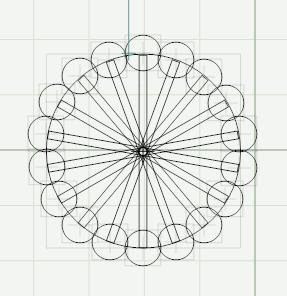
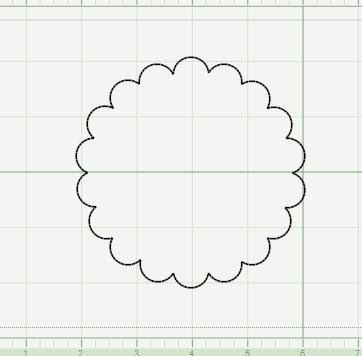
Push the preview button to check that it is all welded
(well not the straights but they are only temporary)




Dear Susan,
ReplyDeleteThanks so much for showing this circle scallop. You are so very talented and we appreciate all that you do!!!!
Thanks so much!!! I'm so excited right now!!! I actually made a scallop circle!!!
ReplyDeleteDear Susan,
ReplyDeleteThank you for the wonderful directions! I can't wait to try my own scallop circle. You are very, very good at giving directions. I am also enjoying all your inchies cards. They are very cute!
Thanks Again,
Linda
Awesome Tutorial Susan, thank you so much! I have always gotten a headache trying to get the scallops just right, you are pure genius! THANK YOU!
ReplyDeleteYup! It takes a bit of work but there's no denying that you get a perfectly scallopped circle when you're finished!!
ReplyDeleteThanks Susan, another terrific tutorial
Susan: Thanks so much for sharing your work with us. One question: When I cut it out the scallops also cut on the inside of the circle also, what did I do wrong? Rosie
ReplyDeleteSusan, thanks so much I have tried to make a scallop many times but could not get it thanks so much for sharing.
ReplyDeleteLisa
Thanks so much for the lesson!!
ReplyDeleteYeah! This made it easy to do a scalloped circle. Thanks for the instructions. As an additional tip: I wanted my circle to be as close as possible to the right, so I wouldn't waste paper cutting it. I just clicked each small circle and the big circle, and subtracted 1" from the X value. Type in the new value and move all shapes 1" to the right.
ReplyDeleteThank you for your hint, however, I'm not sure what you mean by *subtracted 1" from the X value. Type in the new value and move all shapes to the right*. Rosie Waldt
ReplyDeleteHi Susan - just want to say thanks! I needed a refresher course - apprecite your helping files.
ReplyDeleteTHANK YOU! It worked perfectly. I really appreciate the time you took to do these directions. Love my/your scalloped circle.
ReplyDelete